How to read a CSV file from FTP server in Java and store it’s data into the database
- General
How to read a CSV file from FTP server in Java and store it’s data into the database
In this article, we will learn how to read a CSV (Comma-Separated Values) file from a FTP Server, download it in the local directory and store it’s data into the database.
What Does FTP Server Mean?
An FTP server is a computer that has a file transfer protocol (FTP) address and is dedicated to receiving an FTP connection. The primary purpose of an FTP server is to allow users to upload and download files.
FTP is a protocol used to transfer files via the internet between a server (sender) and a client (receiver). An FTP server is a computer that offers files available for download via an FTP protocol, and it is a common solution used to facilitate remote data sharing between computers.
How to read & download a file from FTP Server?
Now, let’s see how a file can be read & downloaded from remote FTP server.
To perform our task, any one from the following libraries can be used :-
- JSch
- SSHJ
- Apache Commons VFS
Here, we will use SSHJ library because it provides more easy and quickly understable set of steps to accomplish the task.
1. Setting up the Project
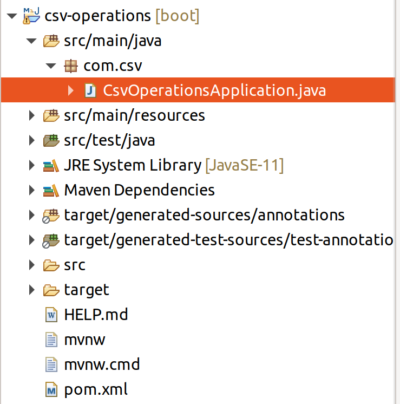
Firstly, let’s create a Spring Boot Application to implement the whole idea.
You can either create the application from https://start.spring.io/ or use an IDE to create it.

2. Adding necessary dependencies
Add the following dependency to the pom.xml file.
|
1 2 3 4 5 6 7 8 9 10 |
<dependency> <groupId>com.hierynomus</groupId> <artifactId>sshj</artifactId> <version>0.27.0</version> </dependency> <dependency> <groupId>org.projectlombok</groupId> <artifactId>lombok</artifactId> <scope>provided</scope> </dependency> |
The latest version of sshj can be found on Maven Central.
Note : Just to make the development easier, we are using Project Lombok library here. This library auto generate getters and setters for each private field with just one-liner annotations(@Getter, @Setter). Also, constructors can be generated using annotations such as (@AllArgsConstructor, @NoArgsConstructor and @RequiredArgsConstructor).
3. Adding FTP credentials in properties file
To keep the FTP related configurations on one place, we’ll define the configurations in the application.properties file.
Add the following configurations in the application.properties file.
|
1 2 3 4 5 6 |
## FTP Configuration ftp.hostname={hostname} ftp.username={username} ftp.password={password} ftp.remoteFile.path={remoteFilePathName} ftp.localDirFile.path={localDirFilePathName} |
hostname represents the name or IP address of the remote server( from which you are reading your CSV file).
username & password should be replaced by the credentials of the remote server.
Remote File path : Location on the remote server, where the file is located. Ex: /home/auriga/Desktop/test.csv
Local Directory File path : Location on the local computer, where the file needs to be downloaded, after being read from the remote server. Ex: /home/chhavi/Desktop/CSV_Operations/src/main/resources/example.csv
Now, let’s create a Constant class and initialize the field values with ftp configurations (defined in application.properties file) earlier.
|
1 2 3 4 5 6 7 8 9 10 11 12 13 14 15 16 17 18 19 20 21 22 |
package com.csv.constant; import lombok.Getter; import lombok.Setter; import org.springframework.beans.factory.annotation.Value; import org.springframework.stereotype.Component; @Component @Getter @Setter public class FtpConstants { @Value("${ftp.hostname}") private String hostname; @Value("${ftp.username}") private String username; @Value("${ftp.password}") private String password; @Value("${ftp.remoteFile.path}") private String remoteFile; @Value("${ftp.localDirFile.path}") private String localDirFile; } |
4. Setting up SSHJ
Next, let’s set up the SSHClient.
An SSH client is a program that allows establishing a secure and authenticated SSH connections to SSH servers.
SSHJ also allows us to use Password or Public Key Authentication to access the remote server. We’ll use the Password Authentication in our example.
Let’s inject the FtpConstants class object using @Autowired notation.
|
1 2 |
@Autowired private FtpConstants ftpConstants; |
Function to setup Sshj –
|
1 2 3 4 5 6 7 8 |
private SSHClient setupSshj() throws IOException { System.out.println("Setting up SSH Client"); SSHClient client = new SSHClient(); client.addHostKeyVerifier(new PromiscuousVerifier()); client.connect(ftpConstants.getHostname()); client.authPassword(ftpConstants.getUsername(), ftpConstants.getPassword()); return client; } |
5. Downloading a File With SSHJ
Function to download a file from SSHJ –
This function requires the remote filepath and the path where that file needs to be downloaded.
|
1 2 3 4 5 6 7 8 |
private void downloadFile() throws IOException { System.out.println("Downloading File from FTP server"); SSHClient sshClient = setupSshj(); SFTPClient sftpClient = sshClient.newSFTPClient(); sftpClient.get(ftpConstants.getRemoteFile(), ftpConstants.getLocalDirFile()); sftpClient.close(); sshClient.disconnect(); } |
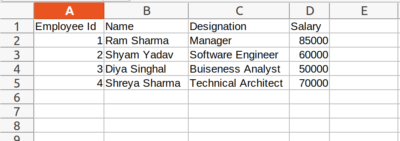
After executing this function, we have successfully downloaded the CSV file from remote server to our local computer.
CSV File’s content:

Note : The file from the remote server can be removed easily after the download operation has been performed, by calling the rm method of SFTPClient :-
|
1 |
sftpClient.rm(ftpConstants.getRemoteFile()); |
How to insert data from CSV to database?
We will be using MySQL as our database. You can use any database to store the data using different database connectors.
1. Adding necessary dependencies
Dependencies to be added in the pom.xml file :
- spring-boot-starter-data-jpa – Spring Data JPA aims to significantly improve the implementation of data access layers by reducing the effort to the amount that’s actually needed. As a developer you write your repository interfaces, including custom finder methods, and Spring will provide the implementation automatically.
- mysql-connector-java – To integrate MySQL database to our application.
|
1 2 3 4 5 6 7 8 9 10 |
<dependency> <groupId>org.springframework.boot</groupId> <artifactId>spring-boot-starter-data-jpa</artifactId> </dependency> <dependency> <groupId>mysql</groupId> <artifactId>mysql-connector-java</artifactId> <scope>runtime</scope> </dependency> |
2. Setting up database configurations in properties file
Define the important properties in the application.properties file for connecting your database with the application.
|
1 2 3 4 5 6 |
## DATABASE CONFIG spring.datasource.url=jdbc:mysql://localhost:3306/csv_model spring.datasource.username=root spring.datasource.password=root spring.jpa.show-sql=false spring.jpa.hibernate.ddl-auto=update |
Replace the datasouce url, username and password with your database configurations.
3. Creating Entity and Repository
To store the CSV content in the database, we will need to create an Entity with fields as CSV file’s headers.
|
1 2 3 4 5 6 7 8 9 10 11 12 13 14 15 16 17 18 |
package com.csv.entity; import lombok.*; import javax.persistence.Entity; import javax.persistence.Id; @Entity @Getter @Setter @AllArgsConstructor @NoArgsConstructor public class Employee { @Id private Long empId; private String empName; private String empDesignation; private Double empSalary; } |
Now, to perform database operations, we’ll need to create a repository for the table that we have created.
|
1 2 3 4 5 6 7 8 |
package com.csv.dao; import com.csv.entity.Employee; import org.springframework.data.jpa.repository.JpaRepository; public interface EmployeeDao extends JpaRepository<Employee, Long> { } |
4. Storing Data into the database
No, let’s create a function to store the file’s data into the database.
|
1 2 3 4 5 6 7 8 9 10 11 12 13 14 15 16 17 18 19 20 21 22 23 24 25 26 27 28 29 30 31 32 |
public void readCsvFile() { try { downloadFile(); File file = new File(ftpConstants.getLocalDirFile()); if (file.exists()) { BufferedReader br = new BufferedReader(new FileReader(file)); String line = ""; String splitBy = ","; String[] headers = br.readLine().split(splitBy); while ((line = br.readLine()) != null) { String[] data = line.split(splitBy); String emp_Id = data[0]; String name=data[1]; String designation=data[2]; String salary=data[3]; if (emp_Id != null && !emp_Id.isEmpty() && name !=null && !name.isEmpty() && designation !=null && !designation.isEmpty() && salary!=null && !salary.isEmpty() && NumberUtils.isParsable(emp_Id) && NumberUtils.isParsable(salary)) { try { Employee employee = new Employee(Long.parseLong(emp_Id),name,designation,Double.parseDouble(salary)); employeeDao.save(employee); } catch (Exception ex) { //Number Format Exception can be generated here logger.error("An Error Occurred::", ex); } } else { logger.info("Invalid row format"); } } } } catch (Exception ex) { logger.error("An Error Occurred::", ex); } } |
Working of above method :-
- Read a file from the specified path using the File and BufferedReader class.
- Since, the CSV file is a comma-seperated file, so, to split the data, we need to define the split by String as “,”.
- Extract the CSV headers into the headers array.
- Then run a loop and extract the record into the data array.
- When all the data is in required format, save the record into the database.
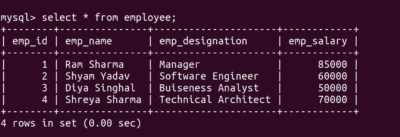
Now, we’ll check whether our content has been successfully saved or not in the database.
Open the terminal and look into the ’employee’ table of our database that we had created earlier.

From the result above, we can say that our CSV’s content has been successfully saved into the database.
This accomplish the purpose of our Blog.
Hope this article helped you and you had fun reading it.😊
Happy Learning!
Related content
Auriga: Leveling Up for Enterprise Growth!
Auriga’s journey began in 2010 crafting products for India’s
