Decoupling Spring services with RabbitMQ
- General
Decoupling Spring services with RabbitMQ
Overview
While working on a project where you are receiving a lot of data from a client source and that too at high speed, then your system may find it overwhelming to process the data while keeping pace with the upstream data source. Decoupling the data ingestion service from the data processing service becomes vital in such situations to ensure the smooth functioning of your system and that there is no pipeline stall which can lead to service breakdown and downtime which means business loss.
Other than that sometimes we need to do asynchronous processing eg. to send SMS, email, process orders or pass information between services. This type of background processing is simply not a task that traditional RDBMS is best suited to solve.
With a message queue, we can efficiently support a significantly higher volume of concurrent messages, messages are pushed in real-time instead of periodically polled, messages are automatically cleaned up after being received and we don’t need to worry about any deadlocks or race conditions.
RabbitMQ and the need for message queues
Message Queues are at the heart of modern software engineering and one of the most vital middle-ware components. Message queues and mailboxes are software-engineering components typically used for inter-process communication (IPC), or for inter-thread communication within the same process. They use a queue for messaging — the passing of control or of content
Messages are stored in the queue until they are processed and deleted. Each message is processed only once, by a single consumer. Message queues can be used to decouple heavyweight processing, buffer, or batch work, and to smooth spiky workloads.

RabbitMQ is the most widely deployed open source message broker, RabbitMQ is lightweight and easy to deploy on-premises and in the cloud. It supports multiple messaging protocols. RabbitMQ can be deployed in distributed and federated configurations to meet high-scale, high-availability requirements.
RabbitMQ originally implemented the Advanced Message Queuing Protocol(AMQP) which is an open standard application layer protocol for message-oriented middleware. and has since been extended with a plug-in architecture to support Streaming Text Oriented Messaging Protocol (STOMP), MQ Telemetry Transport (MQTT), and other protocols.
There is no denying the fact that in today’s modern serverless and microservices architecture, message queues plays a vital role and in fact, are necessary for the working of application following these architectures, some of its vital uses include:-
DECOUPLING: A decoupled architecture is where the different components/layers that make up the system interact with each other using well-defined interfaces rather than depending tightly on each other. With such an architecture, the components/layers can be developed independently without having to wait for their dependencies to complete.
SCALABILITY: Because message queues decouple your system/component, it’s easy to scale up every individual component without worrying about any code change or configuration change.
TRAFFIC SPIKES: You don’t always know exactly how much traffic your application is going to have. By queuing the data we can be assured the data will be persisted and then be processed eventually, even if that means it takes a little longer than usual due to a high traffic spike.
MONITORING: Message queuing systems enable you to monitor how many items are in a queue, the rate of processing messages, and other stats. This can be very helpful from an application monitoring standpoint to keep an eye on how data is flowing through your system and if it is getting backed up.
ASYNCHRONOUS COMMUNICATION: A lot of times, you don’t want to or need to process a message immediately. Message queues enable asynchronous processing, which allows you to put a message on the queue without processing it immediately. Queue up as many messages as you like, then process them at your leisure.
Using RabbitMQ with Spring services
In this demo, we will create a basic spring application that will demonstrate two services communicating using RabbitMQ. It will contain a scheduler that will generate random documents every half second and feed them to the queue thus simulating fast incoming traffic.
A simple method in the same project will then consume those messages from the queue and simply logs them out on the console simulating the data processing service which will be decoupled successfully.
Steps
First, create a project with Spring initializer or in your ide if it supports the creation of Spring project with the following dependencies
|
1 2 3 4 5 6 7 8 9 |
<dependency> <groupId>org.projectlombok</groupId> <artifactId>lombok</artifactId> <optional>true</optional> </dependency> <dependency> <groupId>org.springframework.boot</groupId> <artifactId>spring-boot-starter-amqp</artifactId> </dependency> |
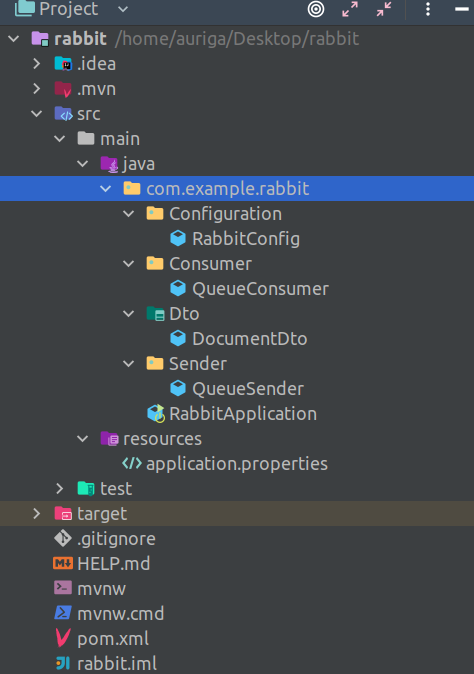
That’s all you need for using RabbitMQ with spring, Lombok is optional if you want to get rid of the boilerplate getter, and setter code. This is how the final project structure should look like

Now we will create a configuration class that will tell Spring everything about how to use the RabbitMQ queue, which exchange to use, queue type, etc.
|
1 2 3 4 5 6 7 8 9 10 11 12 13 14 15 16 17 18 19 20 21 22 23 24 25 26 27 28 29 30 31 32 33 34 35 36 37 38 39 |
@Configuration @ConfigurationProperties(prefix = "rabbit.conf") @Getter @Setter public class RabbitConfig { private String queue; private String exchange; private String routingKey; private String queueType; @Bean public Queue queue() { HashMap<String, Object> map = new HashMap<>(); map.put("x-queue-type", queueType); return new Queue(queue, true, false, false,map); } @Bean public DirectExchange exchange() { return new DirectExchange(exchange); } @Bean public Binding binding(Queue queue, DirectExchange exchange) { return BindingBuilder.bind(queue).to(exchange).with(routingKey); } @Bean public MessageConverter jsonMessageConverter() { return new Jackson2JsonMessageConverter(); } @Bean public AmqpTemplate rabbitTemplate(ConnectionFactory connectionFactory) { final RabbitTemplate rabbitTemplate = new RabbitTemplate(connectionFactory); rabbitTemplate.setMessageConverter(jsonMessageConverter()); return rabbitTemplate; } |
The message converter is used because we want to pass and retrieve objects from the queue and not just plain string. The name of the queue, exchange, queue type and routing key are all defined and picked from the properties file as shown below
|
1 2 3 4 5 6 7 8 9 10 11 12 |
spring.rabbitmq.host=localhost spring.rabbitmq.port=5672 spring.rabbitmq.username=guest spring.rabbitmq.password=guest spring.main.allow-bean-definition-overriding=true rabbit.conf.queue=SampleQueue rabbit.conf.threads=4 rabbit.conf.exchange=DirectExchange rabbit.conf.queue-type=quorum rabbit.conf.routing-key=sample.routing.key |
Note also that the connection parameters that are needed to connect to the RabbitMQ server are also mentioned in the properties file
Now we will create a document dto which will represent any object that we need to store temporarily in the queue until a downstream service is available to retrieve and process it.
|
1 2 3 4 5 6 7 |
@Getter @Setter public class DocumentDto { private String name; private String document; private Long id; } |
Now we will simulate the data-producing service with a scheduler that will generate random documents and send them to the queue every half second, simulating high traffic.
|
1 2 3 4 5 6 7 8 9 10 11 12 13 14 15 16 17 18 19 20 21 22 23 24 25 26 27 |
@Component @RequiredArgsConstructor public class QueueSender { Logger log = LoggerFactory.getLogger(QueueSender.class); private final AmqpTemplate rabbitTemplate; private final RabbitConfig rabbitConfig; public void send(DocumentDto documentDto) { rabbitTemplate.convertAndSend(rabbitConfig.getExchange(), rabbitConfig.getRoutingKey(), documentDto); log.info("Sent document titled : {}",documentDto.getName()); } @Scheduled(fixedRate = 500) private void sendMessage() { DocumentDto documentDto = new DocumentDto(); String generatedString = new Random().ints(97, 122 + 1) .limit(6) .collect(StringBuilder::new, StringBuilder::appendCodePoint, StringBuilder::append) .toString(); documentDto.setName(generatedString); documentDto.setDocument("A random very long document..."); documentDto.setId(new Random().nextLong()); send(documentDto); } |
The convertAndSend method is used to convert the payload in the required format and send it to the queue, Also note that for the scheduler to work you need to enable scheduling in your application by using @EnableScheduling annotation on any of your configuration classes.
Now with our producer in place, the final step is to create the document processing method which will simply retrieve a document from the queue and logs it to the console simulating the processing service.
|
1 2 3 4 5 6 7 8 9 10 |
@Component public class QueueConsumer { Logger log = LoggerFactory.getLogger(QueueConsumer.class); @RabbitListener(queues = {"${rabbit.conf.queue}"}, concurrency = "2") public void receive(@Payload DocumentDto documentDto) throws InterruptedException{ TimeUnit.MILLISECONDS.sleep(ThreadLocalRandom.current().nextLong(10000)); log.info("Document entitled " + documentDto.getName() + " with id : " + documentDto.getId() + " received successfully by thread : " +Thread.currentThread().getName()); } |
The @RabbitListener is a highly configurable annotation as it allows us to listen to anything happening on the queue and control how we process the messages that come on that queue, for example, the concurrency parameter controls how many concurrent threads will be used to process the upcoming traffic.
With everything all set and ready, let’s run the application and see the magic of Rabbit in action, make sure that you have an instance of RabbitMQ running either on your local system or somewhere else in the cloud, and mention the appropriate connection strings in the property file
I am running the RabbitMQ server on my local machine using a Podman container, the command is:
|
1 |
podman run -it --name rabbitmq -p 5672:5672 -p 15672:15672 rabbitmq:3.10-management |
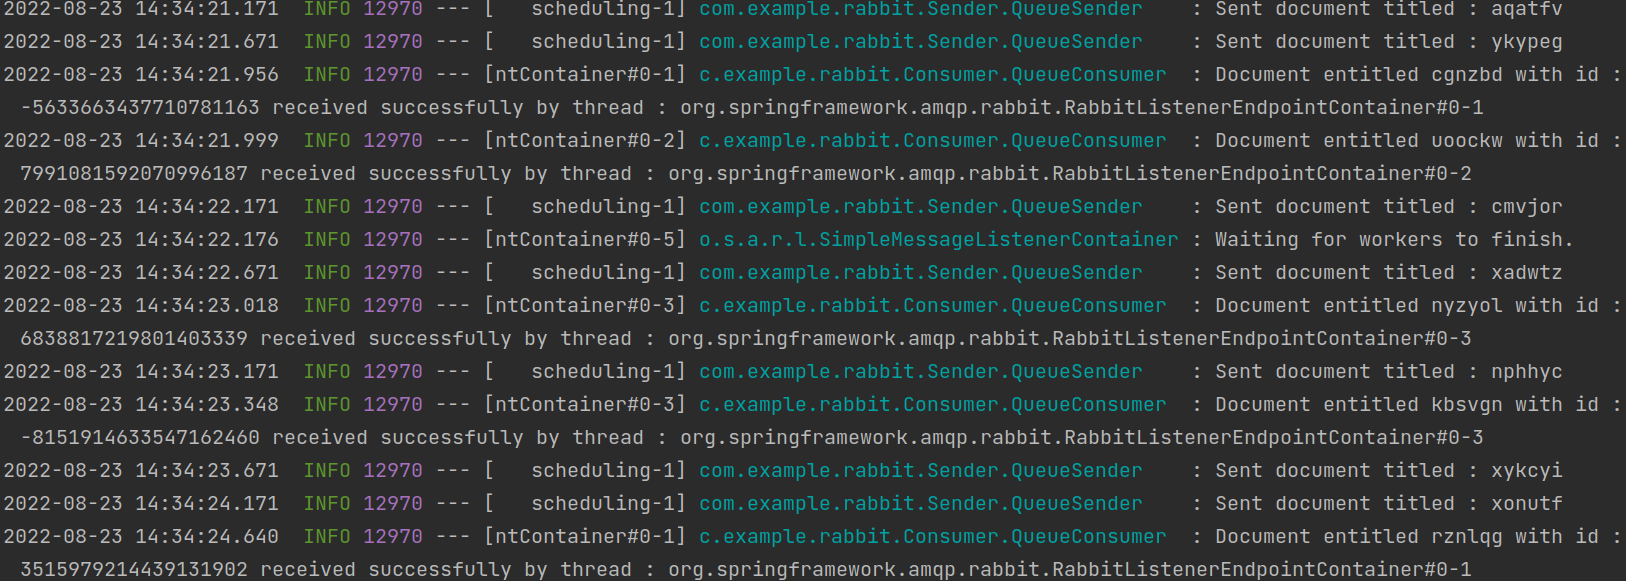
Here is the output :

As you can see, since our concurrency factor was two so there are two threads listening for the messages but because of the high traffic, they are getting bottlenecked. You can increase or decrease the concurrency factor based on your requirement but more threads mean more utilization of the underlying hardware so you need to be careful. Here is the output after the concurrency factor was made four

Conclusion
We have seen the importance of message queues in today’s modern software architecture and then, particularly how to use RabbitMQ one of the most popular open source queuing solutions to decouple spring services.
Related content
Auriga: Leveling Up for Enterprise Growth!
Auriga’s journey began in 2010 crafting products for India’s
