
- Data & Analytics
Creating Custom Filters on Apache Superset
Creating Custom Filters on Apache Superset

Introduction to Apache Superset
Apache Superset is an open-source platform for data visualization. It is a very powerful tool and offers variety of features, along with an easy-to-use UI. It allows users to quickly create charts, add them to dashboards and analyze large volumes of data with a simple and intuitive interface.
In this blog, we will navigate through the types of filters available on Apache Superset and how to use them. To read more about how to start with Apache Superset, click here.
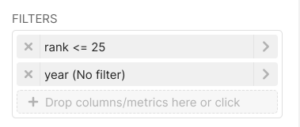
Apache Superset allows filtering on both chart-level and dashboard-level.
Chart-level filtering is defined in a chart’s configurations:
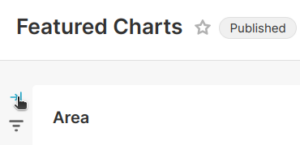
Dashboard-level filtering is used to apply a filter on multiple (or all) charts on a dashboard. To navigate to the dashboard filters, go to one of the dashboard pages and click the expand button which has an arrow icon on the left side of the screen.
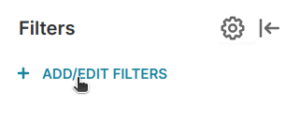
Click on “+ ADD/EDIT FILTERS” to go on filter configuration page where you can add new filters or edit any existing filters.
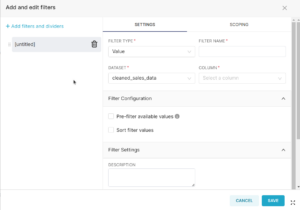
On this page, there are two tabs: 1. Settings, 2. Scoping.
Settings tab has three sections. The first section has some required fields. “Filter Type” and “Filter Name” appear for all types of filters, while the other two, “Dataset” and “Column”, vary for each filter type.
“Filter Type”, as the name suggests, represents the type of the filter and the “Filter Name”, also as the name suggests, is the name of the filter that you want to provide. “Dataset” represents the dataset from which you want your filter values/range to be extracted from. “Column” is the column on which the filter will be applied.
Types of Filter
Apache Superset offers five types of dashboard level filter:
- Value
- Numerical range
- Time range
- Time column
- Time grain
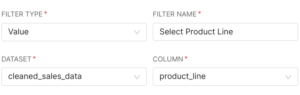
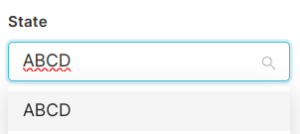
1. Value
In Value filter type, all four fields of the first section appear.
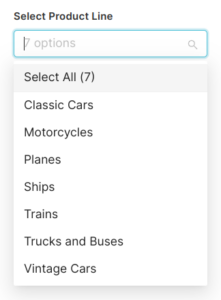
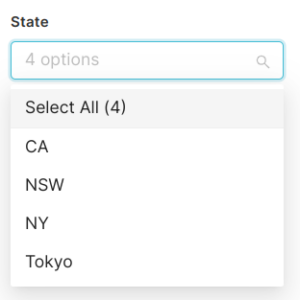
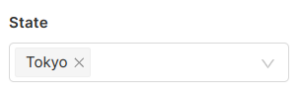
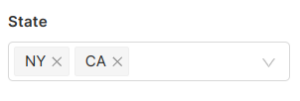
Value filter creates a drop-down with all the available unique values for that column. For example, this is a value type filter for product line column:
This is what the filter looks like on the dashboard:
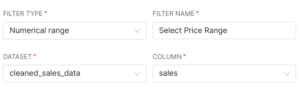
2. Numerical Range
In Numerical Range filter type too, all fields of the first section appear.
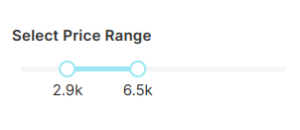
This filter creates a slider with two select points to define a range. The left-most point of the slider represents the lowest value available from that column, while the right-most represents the highest value.
This is what the filter looks like on the dashboard:
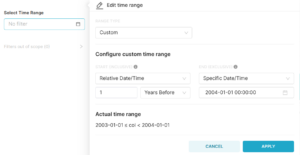
3. Time Range
In Time Range filter type, only two fields appear in the first section: “Filter Type” and “Filter Name”.
This filter creates a button, which, when clicked, shows a pop-up to configure a time range. Apache Superset offers a wide range of generic configurations (such as Last Day, Last Week, Previous Day, Previous Week, Current Day, Current Week, etc.) available for this filter. It also provides custom time range selection, which looks like this:
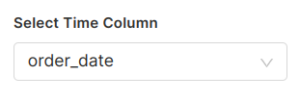
4. Time Column
In Time Column filter type, three fields, except “Column”, appear in the first section.
This filter creates a drop-down to select a column which will be referred to as the time column for the dashboard. This type of filter is only useful when there are multiple time columns in the dataset.
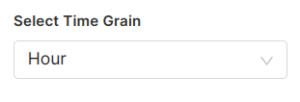
5. Time Grain
In Time Grain filter type, like Time Column, three fields, except “Column”, appear in the first section.
This filter creates a drop-down to select a time grain, on whose basis, the time column of the dataset is grouped by.
The next section on the settings tab is “Filter Configuration”, in which all the fields are optional. Whether a field will appear or not for a particular filter depends on the type of the filter. Following are the possible fields in this section:
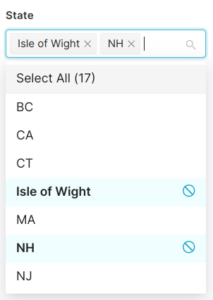
Dependant Filters
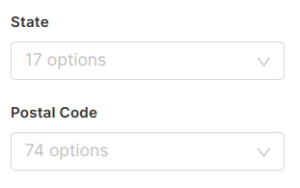
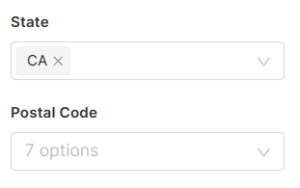
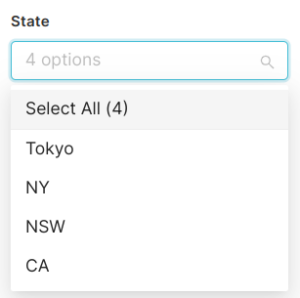
This option is available only for Value type filters. It allows users to create a filter dependant on another filter. In dependant filters, if we select a value for the parent filter, the available options for child filter are filtered according to that. For example, in the below example, Postal Code filter is dependant on State filter:
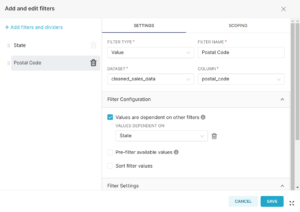
When no value is selected for State filter, all the available values for Postal Code filter appear. But when you select some value(/s) for State filter, available values for Postal Code are filtered accordingly.
1.
2.
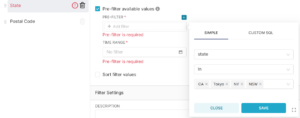
Pre-filtering
This option is available for two filer types: Value and Numerical Range. Using this, users can limit available options for a filter, instead of showing all the options.
Users can either select pre-filter configuration or they can write their custom SQL too.
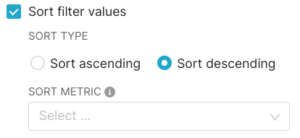
Sort Filter Values
This option is available for all filter types, except Numerical Range. Using this, users can sort available values for a filter in ascending order, or descending order, or by a metric in the dataset.
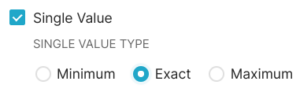
Single Value
This option is only available for Numerical Range type filter. This option simply makes the Numerical Range filter slider to have only one select point instead of two. The other select point is either at the left-most point on the slider, or the right-most point, or coincides with the first point.
There are three available options to select from for Single Value configuration:
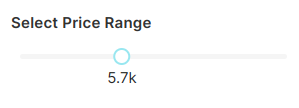
1. Minimum
In this setting, the select point on Numerical Range filter indicates the minimum value (inclusive) for the filter. In other words, the other select point is at the maximum available value of the range.
The above filter will only show data where price is greater than or equal to 5.7k.
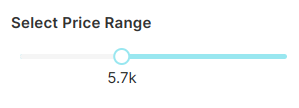
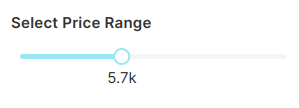
2. Exact
In this setting, both the select point coincide. Basically, the range filter becomes a value filter, with the point selected on the range works as the value.
The above filter will only show data where price is equal to 5.7k.
3. Maximum
Similar to Minimum setting, this time the select point indicates the maximum value for the filter, which means the other select point is at the minimum available value of the range.
The above filter will only show data where price is less than or equal to 5.7k.
The next, and the final, section on settings tab is “Filter Settings”. Similar to the “Filter Configuration” section, all the fields are optional in this section and their appearance depends on the type of the filter. Following are the possible fields of the section:
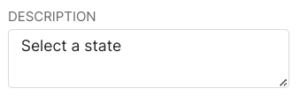
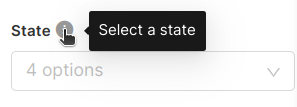
Description
This field appears for all filter types. This is to create a short description for the filter which appears when user hovers over the filter.
1.
2.
Default Value
This field also appears for all filter types. This field populates the filter by default with the selected value (or range, or time range, or time column, or time grain).
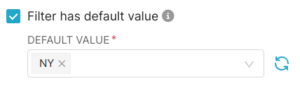
Value Required
This field also appears for all filter types. If user selects this field, it is mandatory to select a value for this filter, and hence, the user also has to provide a default value for the filter.
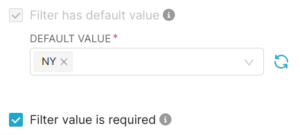
When the database is large, this setting is useful to prevent users from fetching unfiltered data, which can cause performance issues.
Select First Filter Value by Default
This field only appears for Value type of filter. When this field is selected, the default value field is disabled because the first available value automatically becomes the default value for the filter.
Multiple Values
This field also only appears for Value type of filter. This setting allows users to select multiple values for the filter.
Dynamic Search
This field also only appears for Value filter type. Since Apache Superset only allows a maximum of 1000 values for a filter, so in case user has a large dataset for a filter, they can use this option to filter data by dynamically typing a value in search bar.
Inverse Selection
This field too only appears for Value filter type. When a user enables this setting for a filter, then the filter shows the data for all the values, except for the ones that are selected.
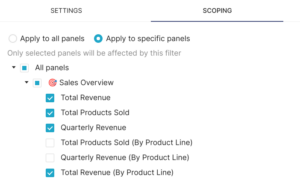
Filter Scoping
The 2nd tab on “ADD/EDIT FILTERS” page is Scoping. Scoping is used to configure the charts on which the user wants to apply the filter. There are two different options in this setting.
First is to apply the filter to all the charts on the dashboard by selecting “Apply to all panels” option.

Second is to select “Apply to specific panels” option, which allows the user to select individual charts they want to apply the filter on.
Conclusion
Filters are essential for any data visualization tool and Apache Superset offers a variety of those with different types of pre-defined settings, while also leaving room for customization. Using these filters, users can create very insightful dashboards as the filters allow you to narrow down to the smallest details in your data.
References
Related content

Auriga: Leveling Up for Enterprise Growth!
Auriga’s journey began in 2010 crafting products for India’s [...]
Stay Close to What We’re Building
Get insights on product engineering, AI, and real-world technology decisions shaping modern businesses.


