Creating custom Spring Events
- Digital Engineering
Creating custom Spring Events
In this article, we will create a simple spring boot application to demonstrate sping events.
Events are one of the framework’s most underutilized but also most valuable capabilities. Spring events are published using publishers and we need a listener who listens to the published events. Any event can have multiple listner.
Spring includes functionality for creating, publishing, and listening to events in event handlers. In spring, we can create custom events according to our needs, which are synchronous by default. To create/listen to custom events:
1. The event should extend ApplicationEvent
2. The publisher should inject an ApplicationEventPublisher object
3. The listener should implement the ApplicationListener interface
WHY DO WE NEED SPRING EVENTS
Sometimes we need the ability to listen for specific application events in our spring application so that you may process them according to our logic.
For example, Sending a welcome mail when a user registers to our application or any similar action. We can also write the event processing code as a separate method in our existing application code, but it will be tightly coupled with the application. Also, Spring events can be asynchronous so all extra processing is not dependent on the main thread.
CREATING CUSTOM SPRING EVENT

Create a Spring Project from start.spring.io with the spring-boot-starter-web dependency. If you have already created a spring starter project then paste this code into your pom.xml file.
|
1 2 3 4 5 6 7 8 9 10 |
<dependency> <groupId>org.springframework.boot</groupId> <artifactId>spring-boot-starter-web</artifactId> </dependency> <dependency> <groupId>org.projectlombok</groupId> <artifactId>lombok</artifactId> <optional>true</optional> </dependency> |
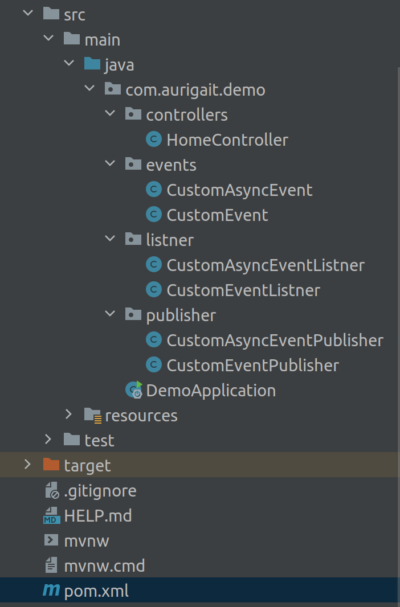
Now create a new class for the event(CustomEvent). This custom class should extends ApplicationEvent.
|
1 2 3 4 5 6 7 8 9 10 11 |
@Getter @Setter public class CustomEvent extends ApplicationEvent { private String message; public CustomEvent(Object source, String message) { super(source); this.message = message; } } |
Now create a class for making a publisher(CustomEventPublisher). This is responsible for publishing our CustomEvent and Listener will be listening to the published events.
|
1 2 3 4 5 6 7 8 9 10 11 12 13 |
@Component public class CustomEventPublisher { @Autowired private ApplicationEventPublisher applicationEventPublisher; public String publishCustomEvent(String message) { System.out.println("Publishing a custom event."); CustomEvent customEvent = new CustomEvent(this, message); applicationEventPublisher.publishEvent(customEvent); return "Custom event triggered"; } } |
Now create a class for making a Listener(CustomEventListner). This class should implement ApplicationListener<CustomEvent>. This class will be listening to the CustomEvent published.
|
1 2 3 4 5 6 7 8 9 10 11 12 13 |
@Component public class CustomEventListner implements ApplicationListener<CustomEvent> { @Override public void onApplicationEvent(CustomEvent event) { Long seconds = 5000L; try { Thread.sleep(seconds); System.out.println("Received spring custom event - " + event.getMessage()); } catch (InterruptedException e) { throw new RuntimeException(e); } } } |
Here, Thread.sleep() is used to halt the current thread for some time. This is just to demonstrate the time taken by the event listener to complete the execution. If the processing time of the custom event listener is more then we can make it Asynchronous.
To make an Asynchronous listener add @Aysnc annotation. Create a new class(CustomAsyncEventListner), example –
|
1 2 3 4 5 6 7 8 9 10 11 12 13 14 |
@Component @Async public class CustomAsyncEventListner implements ApplicationListener<CustomAsyncEvent> { @Override public void onApplicationEvent(CustomAsyncEvent event) { Long seconds = 5000L; try { Thread.sleep(seconds); System.out.println("Received spring custom async event - " + event.getMessage()); } catch (InterruptedException e) { throw new RuntimeException(e); } } } |
Publisher for Async event.
|
1 2 3 4 5 6 7 8 9 10 11 12 13 |
@Component public class CustomAsyncEventPublisher { @Autowired private ApplicationEventPublisher applicationEventPublisher; public String publishCustomAsyncEvent(String message) { System.out.println("Publishing a custom async event."); CustomAsyncEvent customEvent = new CustomAsyncEvent(this, message); applicationEventPublisher.publishEvent(customEvent); return "EVENT TRIGEERED"; } } |
Also, add @EnableAsync to your application class.
|
1 2 3 4 5 6 7 8 9 |
@SpringBootApplication @EnableAsync public class DemoApplication { public static void main(String[] args) { SpringApplication.run(DemoApplication.class, args); } } |
Now create a controller for testing the CustomEvent we have created now.
|
1 2 3 4 5 6 7 8 9 10 11 12 13 14 15 16 17 18 19 20 21 22 23 24 25 |
@RestController public class HomeController { @Autowired private CustomEventPublisher customEventPublisher; @Autowired private CustomAsyncEventPublisher customAsyncEventPublisher; @RequestMapping(value = "/event", method = RequestMethod.GET) public String root(){ System.out.println("Entered into controller."); customEventPublisher.publishCustomEvent("First event"); System.out.println("Finished execution"); return "Hello World!"; } @RequestMapping(value = "/asyncEvent", method = RequestMethod.GET) public String asyncEvent(){ System.out.println("Entered into controller."); customAsyncEventPublisher.publishCustomAsyncEvent("Async event"); System.out.println("Finished execution"); return "Hello World!"; } } |
That’s it! now run your application and open http://localhost:8080/event & http://localhost:8080/asyncEvent
The ‘event‘ endpoint will take 5 sec to return the response while ‘asyncEvent’ endpoint will return the response instantly.
CONCLUSION
In this article, we have learned about spring events and also created custom spring events. Similarly, you can create custom events according to your needs. I hope you really enjoyed this article and had fun reading it.😊
Stay safe.
Related content
Auriga: Leveling Up for Enterprise Growth!
Auriga’s journey began in 2010 crafting products for India’s
