Docker Series – Blog 1: Getting Started with Docker and Building Your First Image
- General
- DevOps

Docker Series – Blog 1: Getting Started with Docker and Building Your First Image
In the ever-evolving landscape of software development and deployment, containerization has emerged as a revolutionary technology. Getting Started with Docker is the first step in this journey, where we will explore core Docker concepts, its architecture, and key components. Our overarching objective is to equip you with the knowledge and insights needed to navigate the containerization industry successfully. So, let’s embark on your Getting Started with Docker journey!
What is Docker?
Docker comprises a set of platform-as-a-service products that utilize OS-level virtualization to deliver software in packages known as containers. Containers are isolated from one another and bundle their own software, libraries, and configuration files; they can communicate with each other through well-defined channels. Furthermore, a single operating-system kernel runs all containers and is thus more lightweight than virtual machines.
Download and Install Docker: Official Docker Website
Benefits of using Docker
- Consistency and Isolation: Ensuring consistent and isolated application environments, Docker minimizes conflicts and dependency issues.
- Portability: Containers in Docker have the capability to run on any platform that supports Docker, simplifying application deployment across various environments.
- Scalability: Facilitating easy scaling of applications, Docker achieves this through container orchestration tools, ultimately enhancing resource efficiency and availability.
How does Docker work?
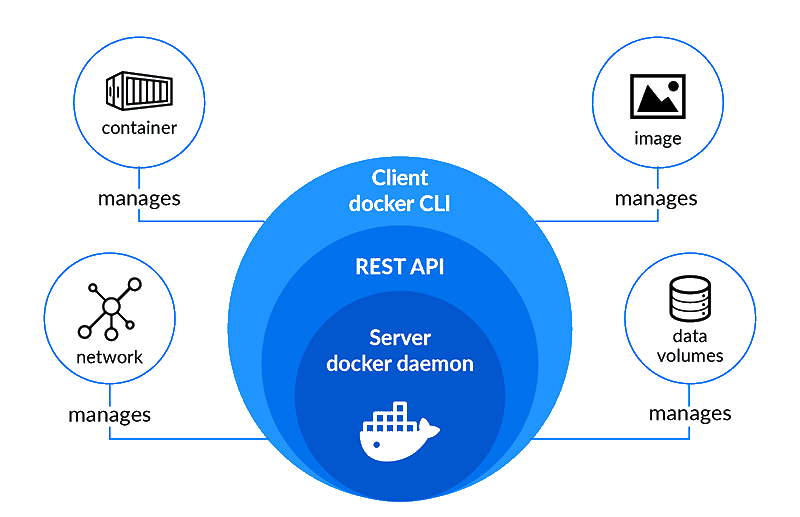
Now that we understand the benefits of using Docker, let’s delve deep into Getting Started with Docker and talk about how Docker works. The core of the Docker system is the Docker Engine, which operates as a client-server application. It consists of three main components:
- First, A server, which is a kind of long-running process called a daemon process.
- Second, A client, which is Docker CLI (command line interface), and
- And finally, A REST API, which is used for communication between the client ( Docker CLI ) and the server ( Docker Daemon )

The Docker daemon receives the command from the client and manages Docker objects, such as images, containers, networks, and volumes. Furthermore, the Docker client and daemon can either run on the same system, or you can connect a Docker client to a remote Docker daemon. They can communicate through REST API, utilize UNIX sockets, and communicate via a network interface.
Dockerfile, Images & Containers
Let’s now explore Dockerfile, Docker Images, and Docker Containers, three crucial terms you must grasp when working with Docker.

As illustrated in the diagram above, when the dockerfile is built, it transforms into a Docker Image. Subsequently, when we run the Docker Image, it evolves into a Docker Container. To understand these three terms better, let’s explore each one individually.
Dockerfile
A dockerfile is a text document that contains all the commands that a user can call on the command line to assemble an image. In essence, Docker can build images automatically by reading the instructions from a dockerfile. You can use docker build to create an automated build to execute several command-line instructions in succession.
Components of a Dockerfile
A typical dockerfile consists of several components and basic dockerfile statements:
- Base Image (FROM):
-
- The
FROMinstruction specifies the base image from which your Docker image will be built. It forms the foundation upon which your application will run. For example,FROM ubuntu:20.04sets the base image as Ubuntu 20.04.
- The
- Environment Setup (RUN, ENV):
-
- The
RUNinstruction executes commands in the image’s shell during the build process. It’s commonly used for installing packages, updating software, or setting up dependencies. - Additionally, the
ENVinstruction sets environment variables within the image, making them accessible to the containerized application.
- The
- Application Code (COPY, ADD):
-
- The
COPYinstruction copies files or directories from your local machine into the image. This is where you typically include your application code. - The
ADDinstruction is similar toCOPYbut has additional capabilities like extracting compressed files.
- The
- Execution Commands (CMD, ENTRYPOINT):
-
- The CMD instruction specifies the default command to run when a container is started from the image. It can be overridden when running the container.
- The ENTRYPOINT instruction sets the primary command and its parameters for the container. Unlike
CMD, it cannot be easily overridden but can be used together with CMD.
Docker Image
In layman terms, Docker Image can be compared to a template that is used to create Docker Containers. So, these read-only templates are the building blocks of a Container. You can use docker run to run the image and create a container.
Docker Images are stored in the Docker Registry, providing a versatile storage option. They can reside either in a user’s local repository or in a public repository like Docker Hub, which fosters collaboration among multiple users for application development.
Docker Container
It is a running instance of a Docker Image as it holds the entire package needed to run the application. Therefore, these are basically the ready applications created from Docker Images which is the ultimate utility of Docker.
Docker commands for everyday use
Here are some important Docker commands for your everyday use:
- Build an Image from a Dockerfile:
- Create a container from an image:
- List Running Containers:
- List of all Containers (Running and Terminated):
- Access a running container:
- Check Container Logs:
- Stopping a running container:
- Kill a Container:
- Deleting a stopped container:
- List of locally stored Docker images:
- Deleting an image from local storage:
Building a Docker Image for a Django Project
Let’s Dockerize a Django Project
Step 1: Create a Dockerfile
To begin, let’s create a Dockerfile for your Django project. Here’s a basic example of a Dockerfile for a Django application:
In this Dockerfile, to commence, we begin with an official Python 3.11.4 image as our foundation. In order to ensure smooth Python execution without buffering and bytecode writing, we set environment variables. Following that, we establish a dedicated working directory within the container. After that, we copy the project’s dependencies listed in requirements.txt and install them. Subsequently, we copy the entire Django project into the container. To finish, we expose port 8000 for the Django application, and the Dockerfile defines the command to start the Django application.
Step 2: Build the Docker Image
Now that you have your Dockerfile, navigate to the directory containing it and build the Docker image with the following command:
Replace my-django-app with a suitable name for your Docker image.
Step 3: Run a Docker Container
Once you build the image, you can run a Docker container from it using the following command:
This command runs the container in detached mode (-d) and maps port 8000 from the container to your host machine. As a result, you can access your Django application by opening a web browser and navigating to http://localhost:8000.
In our first Docker blog, we covered Getting Started with Docker and explored Docker basics, spanning from containerization to architecture, and introduced essential container management commands. However, our journey is just beginning. In our next blog, we’ll show you how Docker simplifies complex app development by Dockerizing a Django project with a database using Docker Compose. Whether you’re a Docker novice or looking to enhance your containerization skills, this series will help you become a Docker master. Thanks for joining us on this Getting Started with Docker journey, and let’s explore more Docker magic together!
References
Related content
Auriga: Leveling Up for Enterprise Growth!
Auriga’s journey began in 2010 crafting products for India’s
