
- General
Google OAuth Integration in Django Without Utilizing django-allauth

Google OAuth Integration in Django Without Utilizing django-allauth
Google OAuth integration in Django project can sometimes seem daunting, especially with the myriad of third-party solutions available. This guide will provide a methodical walkthrough to integrate Google OAuth, devoid of the django-allauth solution.
Source Code: Link
Directory Structure:
STEP 1. Setting Up Google Credentials
- Begin by visiting the Google Cloud Console and create a new project relevant to your application.
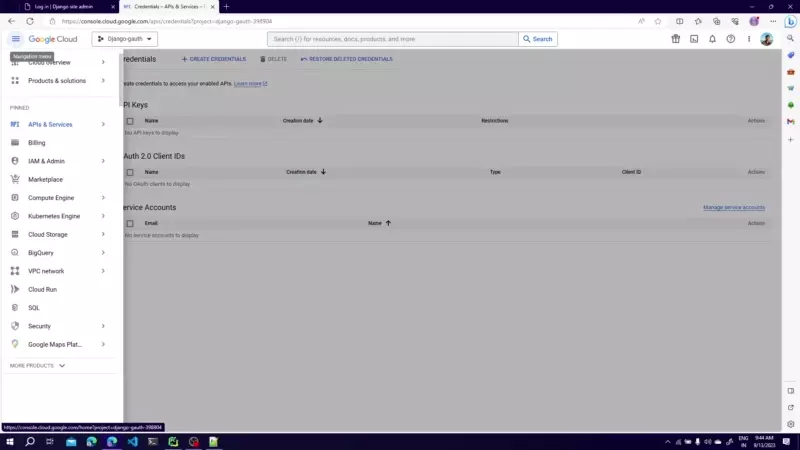
- Navigate to API and Services > Credentials from the menu.
- Click on “Create Credentials” and select “OAuth Client ID”.
- Designate the application type as “Web application” and name it appropriately in relation to your project.
- Include your backend URI in “Authorized JavaScript Origins”. If you’re working locally, it’s typically
http://localhost:8000. - Ensure you add an “Authorized Redirect URI”, set to:
http://localhost:8000/admin/google/callback. - Remember to note down your Client ID and Client Secret for later use for Google OAuth Integration in Django.
STEP 2. Including Essential Libraries
Ensure your project is equipped with the following:
requests: Essential for interacting with Google’s OAuth endpoints.
STEP 3. Google OAuth: A Technical Overview
For in-depth understanding, consider referencing Google’s OAuth Documentation.
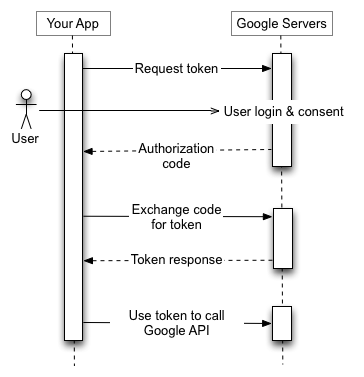
Google OAuth consists of several key endpoints and steps for user authentication and authorization:
1. Authorization URI:
-
- Endpoint:
https://accounts.google.com/o/oauth2/v2/auth - Parameters:
scope: Specifies the requested access scope, e.g., https://www.googleapis.com/auth/userinfo.email.access_type: Indicates whether offline access is requested.include_granted_scopes: Optionally includes granted scopes in the response.response_type: Specifies the response type as code.state: Optional state parameter for maintaining session state.redirect_uri: The URL where the user will be redirected after authorization.client_id: The unique identifier for your application
- Endpoint:
Example URL:
2. Redirect URI:
Upon success, the user is redirected to a specified redirect URI with an authorization code.
-
- Success Response:
Redirect URL:https:///admin/google/callback?code=4/P7q7W91a-oMsCeLvIaQm6bTrgtp7 - Failure Response:
Redirect URL:https:///admin/google/callback?error=access_denied
- Success Response:
3. Exchange Auth Code for Access Token:
To exchange the authorization code for an access token, make a POST request to https://oauth2.googleapis.com/token with the following JSON parameters:
4. Retrieve Access Code:
This process allows your application to obtain an access token, which can be used to authenticate API requests on behalf of the user for the specified scope. The access token has a limited lifespan, but it can be refreshed using the provided refresh token to maintain long-term access to Google services.
5. Use Access Token to Retrieve User Email
- To Get User details use the access code to api
https://www.googleapis.com/oauth2/v2/userinfo?access_token=
Overall, this OAuth flow facilitates secure and authorized access to Google services for your application while preserving user privacy and control.
STEP 4. Adding following in constants.py
STEP 5. Crafting a Custom Google Authentication Backend for Google OAuth in Django
This step is pivotal, as it involves instructing Django on the method to validate a user authenticated via Google:
In this step, we will be creating a custom backend that consists of an authenticate method which returns a user instance on successful authentication and None on failure. This user instance will later be used for login.
STEP 6. Modifying settings.py
To confirm Django acknowledges our custom backend, it must be integrated into the settings.
Update settings.py
STEP 7. Implementing Views
These are the view functions that handles user request:
We will be defining two views:
google_loginwill redirect user to google consent URIgoogle_callbackwill listen for the response from the google server
STEP 8. Associating Views with URLs
Each view must correspond to a specific URL, ensuring user navigation is coherent, So we will update urls.py to redirect request to views/controllers
STEP 9. Overriding default login Template
The Default login template has to be overridden to add a custom Sign in with google Button:
Update./templates/admin/login.html
Styles to format the Sign in with google button:
STEP 10. Test the application
Execute following commands to test your application.
Visit http://localhost:8000/admin to test your application

NOTE: Access to the Admin Panel is restricted to a few users who have to be added by the super admin in order to use the “sign in with Google” feature. As a result, all users must be created in the admin panel by the super admin.
In conclusion, you have now adeptly integrated Google OAuth into your Django project, independent of django-allauth. It’s advised to run and test your project to ensure seamless functionality. Best of luck with your endeavors.
Related content

Auriga: Leveling Up for Enterprise Growth!
Auriga’s journey began in 2010 crafting products for India’s [...]


