
- Digital Products & Software
How to setup Appium in ubuntu.
How to setup Appium in ubuntu.
What is Appium?
Appium is an open-source project and ecosystem of related software, designed to facilitate UI automation of many app platforms, including mobile (iOS, Android, Tizen), browser (Chrome, Firefox, Safari), desktop (macOS, Windows), TV (Roku, tvOS, Android TV, Samsung), and more.
=> Below are the steps to step up appium:-
Step 1 :- Install Java in your system.
Install any version of java you want :-
- Installing openjdk 11 :-
- Run these following commands to install the java 11 :
1$ sudo apt update1$ sudo apt install openjdk-11-jdk - Once the installation is complete, you can verify it by running the following command:
1$ java -version - The output should look something like this :
123openjdk version "11.0.7" 2020-04-14OpenJDK Runtime Environment (build 11.0.7+10-post-Ubuntu-3ubuntu1)OpenJDK 64-Bit Server VM (build 11.0.7+10-post-Ubuntu-3ubuntu1, mixed mode, sharing)
2. Installing openjdk 8 :-
- Run these following commands to install the java 8 :
1$ sudo apt update1$ sudo apt install openjdk-8-jdk - Once the installation is complete, you can verify it by running the following command:
1$ java -version - The output should look something like this :
123openjdk version "1.8.0_252"OpenJDK Runtime Environment (build 1.8.0_252-8u252-b09-1ubuntu1-b09)OpenJDK 64-Bit Server VM (build 25.252-b09, mixed mode)
=> Setting the default version of java : –
- If you have multiple Java versions installed on your Ubuntu system you can check which version is set as the default one by typing:
1$ java -version - To change the default version, use the update-alternatives command:
1$ sudo update-alternatives --config java - The output will look something like below:
123456There are 2 choices for the alternative java (providing /usr/bin/java).Selection Path Priority Status------------------------------------------------------------* 0 /usr/lib/jvm/java-11-openjdk-amd64/bin/java 1111 auto mode1 /usr/lib/jvm/java-11-openjdk-amd64/bin/java 1111 manual mode2 /usr/lib/jvm/java-8-openjdk-amd64/jre/bin/java 1081 manual mode
Press to keep the current choice[*], or type selection number:
You will be presented with a list of all installed Java versions. Enter the number of the version you want to be used as the default and press Enter.
Step 2 : – Install Android Studio in your system.
- Open “ubuntu software” application in your system.
- Search “Android Studio”.
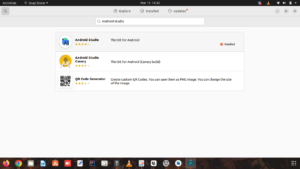
- Select the first one and click on “Install” button.
- After successful installation , open the application and you will get a pop up of “Import Android Studio Settings” and in that select “Do not import settings” radio button and click on “OK” button.
- Now you will get an “Help improve Android Studio” pop up -> click on “Don’t send” button.
- After that you are on “Android Studio Setup Wizard” window -> click on “Next” button -> select “Standard” install type and click on “Next” button -> select any UI theme and click on “Next” button -> again click on “Next” button at Verify Settings page -> click on “Accept” radio button at License Agreement page and click on “Next” button -> click on “Finish” button -> Now the some components will download -> click on “Finish” button.
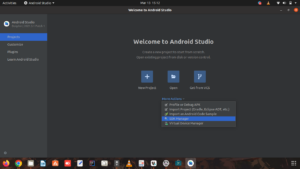
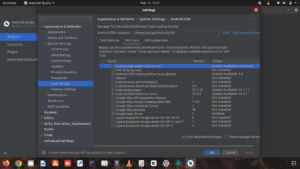
- Now you will be on “Welcome to Android Studio” window -> click on “More Actions” dropdown -> select “SDK Manager”.
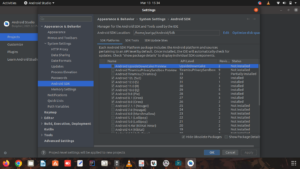
- Now you will be at “Settings” page -> at “SDK platforms” tab , select Android 12 to Android 8 -> click on “SDK tools” tab and select Android SDK Build-Tools 34-rc2 , Android SDK Command-line Tools (Latest) , Android Emulator , Android SDK Platform-Tools , Google Web Driver -> click on “Apply” button -> click on “OK” button.
Remember :- After all this, In Files you will get an “Android” folder in Home. In that folder you will get all the things you have installed from Android Studio.
Step 3 :- Connection set up in your mobile device.
To set up the connection follow below steps:-
- Connect your mobile device with your system(laptop) through the data cable.
- Open your mobile device settings -> click on “About phone” -> click on “Software information” -> click on “Build Number” 7 times to open the developer options in your mobile device.
Remember :- The above 2 step is for those users who don’t have the developer options in their mobile device.
3. Now at settings page, you will get an “Developer options” -> click on it -> unable the “USB debugging” mode.
Step 4 :- Installing appium desktop and appium inspector.
- For appium desktop (server) : –
- Release v1.22.3-4 · appium/appium-desktop · GitHub -> go to this site and download the Appium-server-GUI -linux AppImage.
- After successful downloading, go to the files -> search “Appium -Server” -> open the properties (right click on the AppImage) -> click on “Permissions” tab -> select “Allow executing file as program”.
- Now double click on downloaded AppImage to open it.
- For appium inspector :-
- Releases · appium/appium-inspector · GitHub -> go to this site and download the Appium-Inspector-GUI- linux AppImage.
- After successful downloading, go to the files -> search “Appium -Server” -> open the properties (right click on the AppImage) -> click on “Permissions” tab -> select “Allow executing file as program”.
- Now double click on downloaded AppImage to open it.
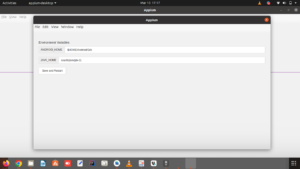
Step 5 :- Set up the environment variables in the bash file.
Follow these below steps :-
- Open the terminal (ctrl + alt + t)
- Run this command :-
1$ nano .bashrc - At the end of the page, add all these below variables with their path and save them with ctrl + shift + s command :-
123export ANDROID_HOME="$HOME/Android/Sdk"export JAVA_HOME="/usr/lib/jvm/jdk-11"export ADB="$ANDROID_HOME/platform-tools/adb” - Close the terminal.
Step 6 :- Open the Appium Desktop (Server) GUI.
- Click on “Edit Configurations” button.
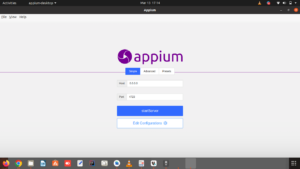
- Fill the environment variables with their corresponding path from the bash file ( in which you have create the path variables).
- Click on “Save and Restart” button.
Remember :- After clicking on this button, the app will not automatically start.You have to start again manually.
- In Host => Enter 127.0.0.1 or remain at 0.0.0.0 address.
- In Port => Enter “4723”.
- Click on “startServer” button.
Step 7 :- Open the Appium Inspector.
Follow the below steps :-
=> In Appium Server tab :-
- In Remote Host -> Enter 127.0.0.1 or remain at 0.0.0.0 address.
- In Remote Port -> Enter “4723”.
- In Remote Path -> Enter “/wd/hub/”.
=> In Desired Capabilities tab :-
-> Copy the below json in JSON Representation box and after that click on “save” icon given in the box.
|
1 2 3 4 5 6 7 8 9 10 11 12 13 14 15 16 17 18 19 |
{ "appium:deviceName": "emulator-5554", "appium:pVersion": "9.0", "appium:appPackage": "com.whatsapp", "appium:appActivity": "com.whatsapp.Main", "appium:udid": "005e3cf00704", "platformName": "Android", "appium:automationName": "UiAutomator2", "appium:noReset": true } |
Remember :-
a) pVersion (platform version) -> Change this as per your mobile device android version.
b) udid -> This will different for every device so change this by running the following command in terminal :-
|
1 |
$ adb devices |
c) appPackage -> This will be only one for each application.
d) appActivity -> There are more than one app Activity for a application.
Note :- In above all desired capabilities, only “udid” and “platformName” are mandatory only to connect your device with appium inspector. To open the particular application, you have to give appPackage and appActivity.
=> Now click on “start session” button.
|
1 |
Download the "Apk Info" application from playstore for 'appPackage' and 'appActivity' of any application all the installed application. |
Note :- If you face any error about Sdk path, close all these applications you have started and start again the appium server and appium inspector.
Related content

Auriga: Leveling Up for Enterprise Growth!
Auriga’s journey began in 2010 crafting products for India’s [...]


