HOW TO WORK WITH SIKULI TOOL
- Quality Engineering
HOW TO WORK WITH SIKULI TOOL
HOW TO WORK WITH SIKULI TOOL :-
1. To work with sikuli first we have to download the sikuli setup.jar from the link given below:
https://launchpad.net/sikuli/+download
2. Create a new folder for sikuli
Move /copy the sikuli setup.jar files in the new created folder.
The path to this folder and it’s name should not contain any blanks or special characters.
3. Now double click on the sikuli setup.jar, if its not working then go to the command prompt go inside folder where your sikuli jar files are present then write below command :
|
1 |
java -jar sikuli-setup.jar |
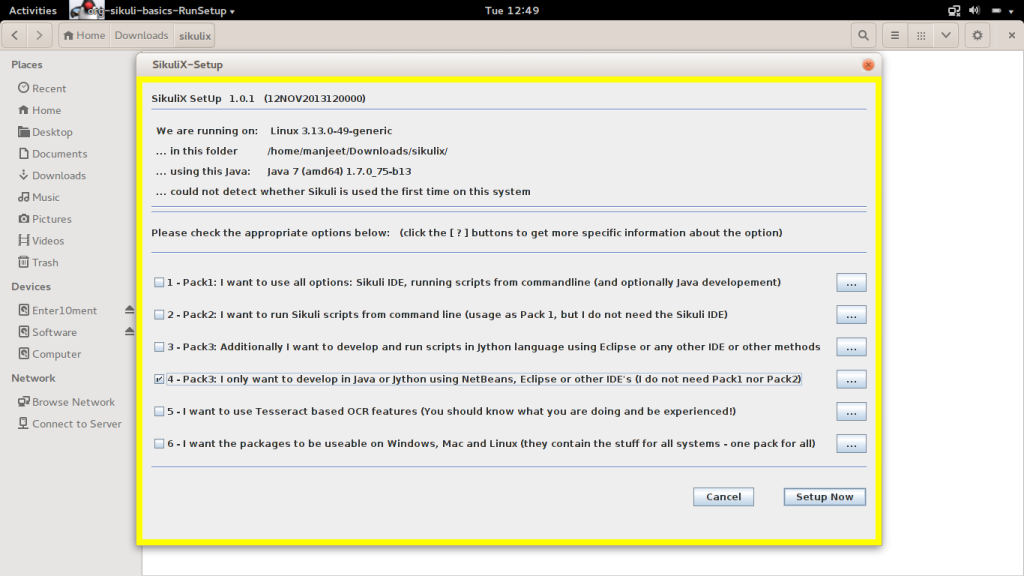
- We will get a page where list of options will be present, you will select the option as per our requirement . I have selected 4th option , click on setup now.
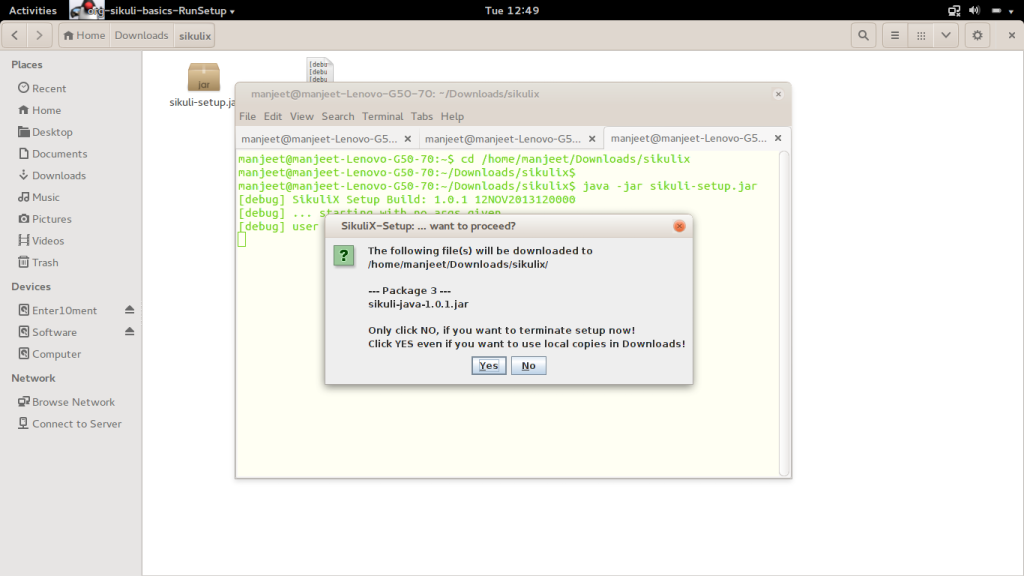
- Click on yes button and it will start downloading
- Once setup will be downloaded then it will start installing.
- We can check in newly created folder there some files will be present.
- To run through ecllipse, we have to add sikuli setup.jar files.
4. To work on sikuli we have to download and install the opencv 2.2+ and tesseract 3
Step 1: Install the dependencies through command prompt:
|
1 |
sudo apt-get -y install libopencv-dev build-essential cmake git libgtk2.0-dev pkg-config python-dev python-numpy libdc1394-22 libdc1394-22-dev libjpeg-dev libpng12-dev libtiff4-dev libjasper-dev libavcodec-dev libavformat-dev libswscale-dev libxine-dev libgstreamer0.10-dev libgstreamer-plugins-base0.10-dev libv4l-dev libtbb-dev libqt4-dev libfaac-dev libmp3lame-dev libopencore-amrnb-dev libopencore-amrwb-dev libtheora-dev libvorbis-dev libxvidcore-dev x264 v4l-utils unzip |
Step 2: Download the opencv :
|
1 2 3 4 |
mkdir opencv cd opencv wget https://github.com/Itseez/opencv/archive/3.0.0-alpha.zip -O opencv-3.0.0-alpha.zip unzip opencv-3.0.0-alpha.zip |
Step 3: Install opencv
|
1 2 3 4 5 6 |
cd opencv-3.0.0-alpha mkdir build cd build cmake -D CMAKE_BUILD_TYPE=RELEASE -D CMAKE_INSTALL_PREFIX=/usr/local -D WITH_TBB=ON -D BUILD_NEW_PYTHON_SUPPORT=ON -D WITH_V4L=ON -D WITH_QT=ON -D WITH_OPENGL=ON .. make -j $(nproc) sudo make install |
Step 4: Finishing installation
|
1 2 |
sudo /bin/bash -c 'echo "/usr/local/lib" > /etc/ld.so.conf.d/opencv.conf' sudo ldconfig |
Download TESSERACT :-
1. Install TESSERACT through command prompt:
sudo apt-get install tesseract-ocr
HOW TO WRITE PROGRAM USING SIKULI IN ECLIPSE :-
- First Take the images on which you want to work using any snipper tool.
- Taking a example of gmail login by sikuli .
- Go to the link : www.google.com
- Cut image for Click on the Gmail link
- Cut image for enter username on the text field .
- Cut image for Click on next button .
- Cut image for enter password on the text field .
- Cut image for Sign In button .
- Cut image for click on account managed button
- Click on signout button .
3. Open the eclipse >> Create package >> Create new class >> Project right click >> build path >> configure build path >> add external jars .
4. add the sikuli-ide.jar files .
5. Check the below program based on the sikuli :-
- Screen is used for focus on the screen.
- Pattern is used to focus on only images.
|
1 2 3 4 5 6 7 8 9 10 11 12 13 14 15 16 17 18 19 20 21 22 23 24 25 26 27 28 29 30 31 32 33 34 35 36 37 38 39 40 41 42 43 44 45 46 47 48 49 50 51 52 |
public class NewTest { @Test public void sikuliTest() throws FindFailed { // create the object of screen. Screen scr = new Screen(); // click on the gmail logo. Pattern img1 = new Pattern("/home/Pictures/gmaillogo.png"); // click on the username textbox Pattern img2 = new Pattern("/home/Pictures/uname.png"); // click on the next button Pattern img3 = new Pattern("/home/Pictures/next.png"); // click on the password textbox Pattern img4 = new Pattern("/home/Pictures/pass.png"); // click on the signin button Pattern img5 = new Pattern("/home/Pictures/signin.png"); // click on the account manager button Pattern img6 = new Pattern("/home/Pictures/click.png"); // click on signout button Pattern img7 = new Pattern("/home/Pictures/signout.png"); WebDriver driver = new FirefoxDriver(); driver.manage().window().maximize(); // go to the google page driver.get("https://www.google.com"); // use wait statement and click on the image scr.wait(img1, 10); scr.click(img1); // enter the text in the username field scr.type(img2, "xxxxxxxx@gmail.com"); scr.click(img3); // enter the text in the password field scr.wait(img4, 10); scr.type(img4, "xxxxxxxx"); scr.click(img5); scr.click(img6); scr.click(img7); } } |
Related content
Auriga: Leveling Up for Enterprise Growth!
Auriga’s journey began in 2010 crafting products for India’s


