
Implementing Azure Speech to Text on React Native

Implementing Azure Speech to Text on React Native
We are in a world where spoken words instantly become written text, thanks to speech-to-text conversion. This isn’t future tech, but a reality powered by Microsoft Azure’s service, Azure Speech to Text. In this blog, we’ll explore how to implement Azure Speech to Text for real-time translation, its capabilities, features, and why it’s a market leader.
Overview:
- Azure Speech to Text is a powerful and versatile cloud-based service offered by Microsoft Azure, designed to convert spoken language into written text. With its robust capabilities, this service enables developers to integrate speech recognition, speech translation, speech transcription, voice assistants, and more.
- Azure Speech to Text boasts remarkable accuracy and supports a wide range of languages and dialects, making it suitable for global applications. It accommodates both real-time and batch processing, allowing for various use cases, from transcribing live conversations to analyzing recorded audio data.
- This service leverages advanced machine learning to continually improve its recognition accuracy, making it highly reliable for diverse applications. Azure Speech to Text’s integration options extend to multiple programming languages and platforms,
Key Features:
- Speech-to-Text Conversion: Converts spoken language into written text, enabling transcription and voice command applications.
- Multilingual Support: Recognizes a wide array of languages and dialects, making it globally applicable.
- Real-Time Processing: Allows for live transcription of conversations and immediate text output.
- Advanced ML Models: Utilizes machine learning and neural networks for continually improving accuracy.
- Versatile Audio Sources: Works with microphones, audio files, and streaming audio, suitable for various applications in industries like healthcare, customer service, and more.
Why Azure Speech to Text
1. Accuracy and Versatility
Azure Speech to Text is renowned for its remarkable accuracy in converting spoken language into written text. It employs cutting-edge machine learning models, constantly fine-tuning its recognition capabilities. This high level of precision is essential for applications that demand accurate transcription, such as legal documentation, medical records, and customer service interactions.
Moreover, Azure Speech to Text supports a wide array of languages and dialects, making it a versatile solution for global applications. Whether your target audience speaks English, Hindi, Tamil, or any other language, Azure Speech to Text can effectively transcribe their speech, breaking down language barriers.
2. Real-Time Processing for Dynamic Interactions
One of the standout features of Azure Speech to Text is its ability to perform real-time speech-to-text conversion. This real-time processing is invaluable for applications that require live interactions, such as voice assistants, call center support, and closed captioning services. Users can experience seamless and instantaneous communication with applications, greatly enhancing user engagement.
3. Flexibility Across Audio Sources
Azure Speech to Text is not limited to a single source of audio input. It accommodates a wide variety of audio sources, including microphones, audio files, and audio streams. This flexibility makes it suitable for diverse use cases. Whether you need to transcribe a live conference call, analyze recorded interviews, or process audio from devices, Azure Speech to Text can handle it with ease.
4. Ease of Integration Across Platforms
Developers often seek solutions that are easy to integrate into their existing ecosystems. Azure Speech to Text offers seamless integration options across multiple programming languages and platforms. Whether you’re working with Python, Java, JavaScript, or C#. Azure provides SDKs and REST APIs that simplify the integration process. This means that you can easily incorporate speech Translation capabilities into your web, mobile, or desktop applications, regardless of your development environment.
5. Secure and Scalable Infrastructure
Security and scalability are paramount considerations when choosing a cloud-based service. Azure, a trusted and globally recognized cloud provider, offers robust security measures to safeguard your data. Your audio data and transcriptions are protected through encryption and Azure’s compliance with industry standards and regulations.
Additionally, Azure Speech to Text is built on a highly scalable infrastructure. Whether you expect a few dozen requests or millions of requests per day, Azure can scale to meet your application’s demands without compromising performance. This scalability is particularly advantageous for businesses with fluctuating workloads, ensuring consistent service availability.
Steps to Implement Azure Speech to Text:
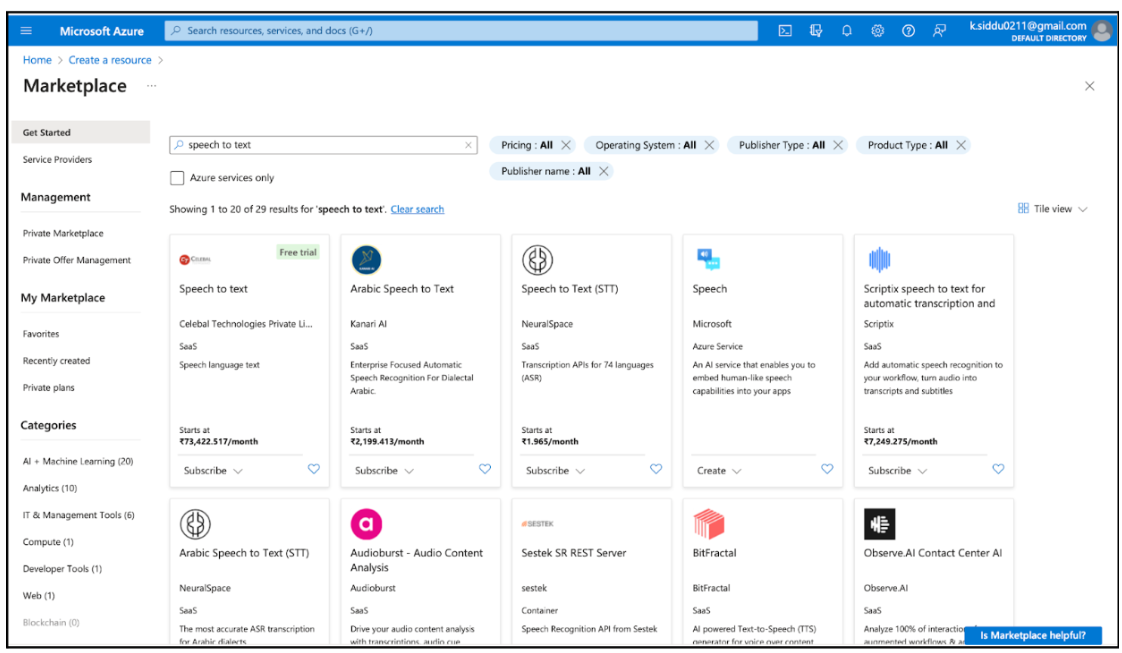
Step 1: Create Azure Resources
Create a Cognitive Services Speech resource in Azure:
- Log in to the Azure Portal.
- Click on “Create a resource.”
- Search for “Speech to text” and select “Speech to text” from the results.
- Follow the prompts to create the resource. Note down the subscription key and region.
Step 2: Set up Speech to Text in Project
Implement Azure speech to text with Javascript:
With the Speech SDK or Speech CLI, you can empower your applications, tools, and devices with the capability to access transcriptions and translations for audio content. As the audio is being processed, you receive real-time, interim results for transcription and translation, allowing you to work with the evolving text as it’s detected. Once the processing is complete, you can utilize these results into the information in various ways. This provides versatility and real-time insights for a wide range of applications, from accessibility features to multilingual communication.
- Install Dependencies:

- Create a translation configuration
create a SpeechTranslationConfig instance by using a key and region. Get the Speech resource key and region in the Azure portal.

- Initialize audio config:
Create an AudioConfig class instance and provide the audioConfig parameter when initializing TranslationRecognizer.
For Web

For React Native:
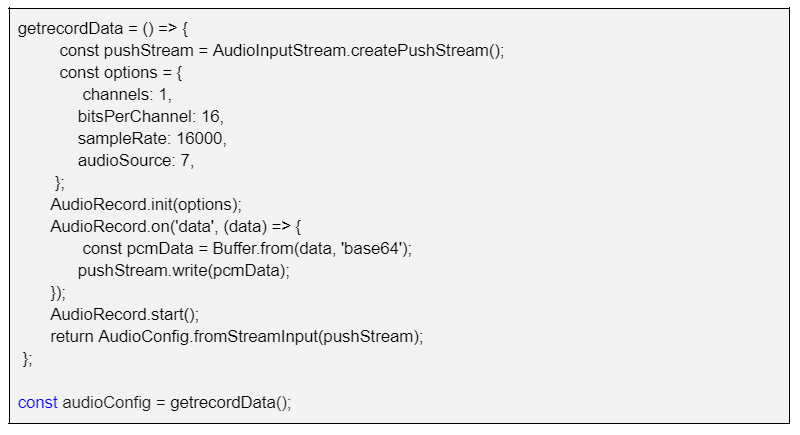
You can uses this code from references from this microsoft code link
- Choose a source language:
A common task for speech translation is specifying the input (or source) language. The following example shows how you would change the input language to Hindi. In your code, find your SpeechTranslationConfig instance and add the following line directly below it:

- Choose a target language:
The available target languages are somewhat different from the source language list. You specify target languages by using a language code, rather than a locale.

- Initialize a translator:
Initialize TranslationRecognizer. When you initialize TranslationRecognizer, you need to pass it your speechTranslationConfig instance. The configuration object provides the credentials that the translation service requires to validate your request.

7. Translate speech:
The TranslationRecognizer class for the Speech SDK for JavaScript exposes methods that you can use for speech translation:
Single-shot translation (async): Performs translation in a nonblocking (asynchronous) mode. It translates a single utterance. It determines the end of a single utterance by listening for silence at the end or until a maximum of 15 seconds of audio is processed.
Continuous translation (async): Asynchronously initiates a continuous translation operation. The user registers events and handles various application states.
In accordance with the application’s specifications, we’ve integrated Continuous Translation. This functionality necessitates your subscription to the recognizing, recognized, and canceled events in order to access the ongoing recognition results. To halt the translation process, it’s imperative to invoke the stopContinuousRecognitionAsync method.

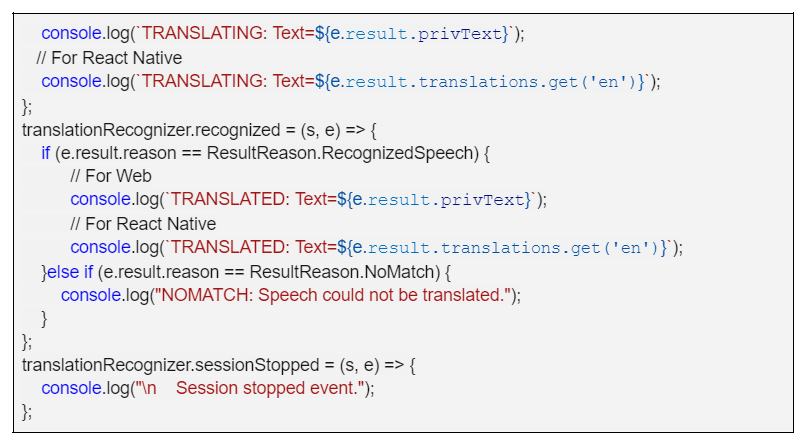
In the above code, you subscribe to the events sent from TranslationRecognizer:
- recognizing: Signal for events that contain intermediate translation results.
- recognized: Signal for events that contain final translation results. These results indicate a successful translation attempt.
- sessionStopped: Signal for events that indicate the end of a translation session (operation).
8. Start Translate:

9. Stop Translate:

For Web:

Related content

Auriga: Leveling Up for Enterprise Growth!
Auriga’s journey began in 2010 crafting products for India’s [...]


