
- Artificial Intelligence
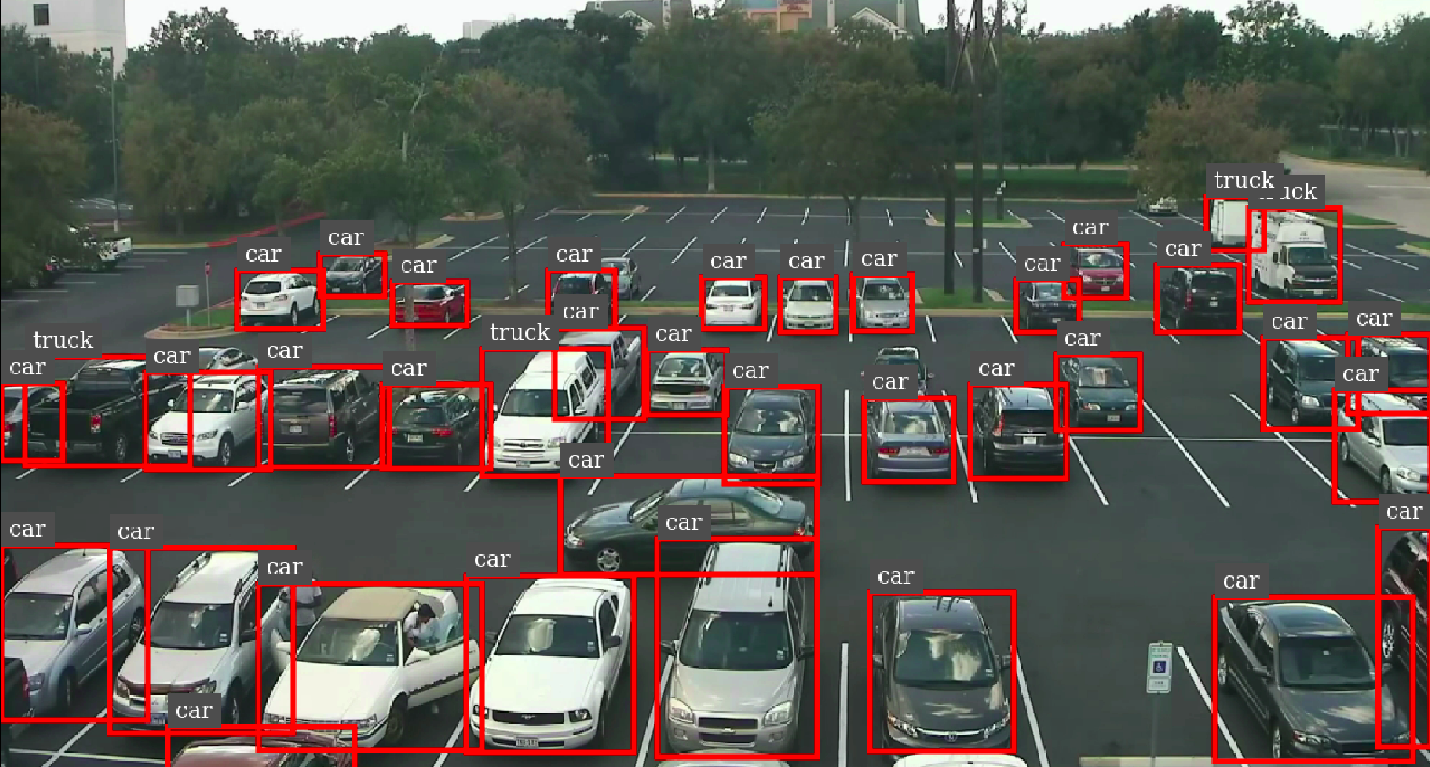
Object Detection Using Yolov4
Object Detection Using Yolov4
What is object detection?
Object detection is a computer vision technique that involves identifying and locating specific objects within images or video streams. It goes beyond simple image classification by not only recognizing objects but also outlining their boundaries. Object detection enables machines to understand the context and spatial relationships of objects, making it valuable in various fields such as autonomous vehicles, surveillance systems, healthcare, and augmented reality.
Applications of Object Detection:
Object detection finds applications in a wide range of fields, contributing to advancements in various industries. Here are a few notable applications:
- Autonomous Vehicles: Object detection plays a critical role in enabling self-driving cars to perceive and respond to their surroundings, detecting and tracking pedestrians, vehicles, and traffic signs.
- Surveillance Systems: Security systems leverage object detection to monitor and identify potential threats, such as unauthorized individuals or suspicious activities in public spaces.
- Healthcare: Object detection assists in medical imaging analysis, facilitating the detection of tumors, anomalies, and other medical conditions from radiographic images.
- Retail and Inventory Management: Object detection technology helps streamline inventory management processes by automatically tracking and identifying products on store shelves.
- Augmented Reality: By detecting and tracking
- objects in real-time, object detection enhances augmented reality experiences, allowing virtual objects to interact seamlessly with the real world.
What is YOLOv4?
YOLO (You Only Look Once) is a real-time object detection algorithm that aims to detect objects in an image in a single pass. YOLOv4 is the fourth iteration of the YOLO algorithm, incorporating numerous advancements to improve accuracy and speed.
YOLOv4 introduces several key features:
- Backbone network: YOLOv4 employs a powerful backbone network, such as CSPDarknet53 or CSPResNeXt50, to extract meaningful features from the input image.
- Neck network: The neck network, which can be either PANet or PANet with FPN, fuses features at different scales to enhance object detection performance.
- Head network: The head network consists of several convolutional layers and predicts bounding boxes, class probabilities, and objectness scores for multiple anchor boxes.
- Feature pyramid: YOLOv4 utilizes a feature pyramid that enables detection at different scales, improving accuracy for objects of varying sizes.
- Improved loss functions: YOLOv4 incorporates focal loss and DIoU loss, which help in handling class imbalance and improving bounding box regression, respectively.
- Data augmentation: To enhance model generalization, YOLOv4 applies various data augmentation techniques, such as mosaic augmentation, random shapes, and mixup.
Training YOLOv4
Training YOLOv4 requires a labeled dataset, consisting of images annotated with bounding box coordinates and corresponding class labels. The training process involves the following steps:
- Data preparation: Images and annotations are organized into a suitable directory structure, with each annotation file containing object coordinates and labels.
- Model configuration: YOLOv4’s configuration file is customized, specifying parameters such as the backbone network, input size, number of classes, anchor sizes, and training hyperparameters.
- Model initialization: Pretrained weights, such as those obtained from ImageNet, can be used to initialize the backbone network. Alternatively, training can start from scratch.
- Training: The model is trained on the labeled dataset using stochastic gradient descent (SGD) or an adaptive optimizer like Adam. The loss function incorporates the predicted bounding boxes, class probabilities, and objectness scores.
- Validation and evaluation: The trained model is evaluated on a separate validation set to measure its performance metrics, such as mean average precision (mAP) and precision-recall curves.
Building YOLOv4
To implement YOLOv4 for object detection, follow these steps:
1. Clone YOLOv4:
|
1 |
!git clone https://github.com/AlexeyAB/darknet |
This command clones the YOLOv4 repository from GitHub, which contains the necessary code for building and training the model.
2. Configure the Makefile:
|
1 |
%cd darknet</code> <code>!sed -i 's/OPENCV=0/OPENCV=1/' Makefile</code> <code>!sed -i 's/GPU=0/GPU=1/' Makefile</code> <code>!sed -i 's/CUDNN=0/CUDNN=1/' Makefile</code> <code>!sed -i 's/CUDNN_HALF=0/CUDNN_HALF=1/' Makefile |
In these commands, we modify the Makefile to enable GPU support, OpenCV, and cuDNN. This ensures that YOLOv4 can utilize the available hardware acceleration for improved performance.
3. Verify CUDA Installation:
|
1 |
!/usr/local/cuda/bin/nvcc --version |
This command verifies the installation of CUDA, a parallel computing platform, on your system. It ensures that YOLOv4 can leverage CUDA for GPU acceleration.
4. Build YOLOv4:
|
1 |
!make |
This command compiles the YOLOv4 source code and builds the executable file, allowing you to run YOLOv4 for object detection tasks.
Training YOLOv4
Now, let’s proceed with training YOLOv4 on a custom dataset. Here are the steps:
1. Prepare Annotated Data:
First, we need to gather and annotate the images for our custom dataset. Here is an outline of the necessary steps:
-
- Clone the dataset repository: Clone the repository containing the dataset for training YOLOv4.
-
1git clone https://github.com/yash-007/Train-YoloV5-on-Custom-Dataset.git
-
- Navigate to the dataset directory: Change the directory to the cloned dataset repository.
-
1cd Train-YoloV5-on-Custom-Dataset.git
-
- Download training images: Download the training images using the provided script, specifying the desired class and the number of images to download.
-
1python main.py downloader --classes "Vehicle registration plate" --type_csv train --limit 1000
-
- Download validation images: Download the validation images using a similar script as in the previous step.
-
1python main.py downloader --classes "Vehicle registration plate" --type_csv validation --limit 200
-
- Edit classes.txt: Edit the classes.txt file to include the class names used in the dataset.
- Convert annotations: Convert the annotations from the dataset format to the required format for YOLOv4.
- Organize folders: Move the annotated images and corresponding annotations into separate folders for training and validation.
- Upload to Google Drive: Zip the training and validation folders and upload them to a Google Drive folder named ‘yolov4’.
- Copy folders to Colab session: Copy the zipped folders from Google Drive to the Colab session for training.
- Unzip folders: Unzip the training and validation folders in the /darknet/data directory using the following commands:
- Clone the dataset repository: Clone the repository containing the dataset for training YOLOv4.
|
1 |
!unzip ../obj.zip -d data/</code> <code>!unzip ../test.zip -d data/ |
2. Custom .cfg file:
Next, we need to configure the custom .cfg file for YOLOv4. Follow these steps:
|
1 |
!cp cfg/yolov4-custom.cfg /mydrive/yolov4/yolov4-obj.cfg |
This command copies the default YOLOv4 configuration file to a new location, which we will modify for our custom object detection task.
Edit the yolov4-obj.cfg file according to the following guidelines:
- Set the batch size and subdivisions for training. Adjust these values based on your hardware capabilities.
- Specify the desired input size for the images, such as width=416 and height=416.
- Set the max_batches parameter based on the number of classes in your dataset. The minimum recommended value is 6000, but you can use a higher value for better results.
- Adjust the steps parameter to 80% and 90% of max_batches, respectively.
- Update the classes and filters parameters according to the number of classes in your dataset.
|
1 |
!cp /mydrive/yolov4/yolov4-obj.cfg ./cfg |
This command copies the modified configuration file back to the cfg folder in the YOLOv4 directory.
3. obj.data and obj.names files:
We need to create obj.data and obj.names files to configure YOLOv4 for our custom dataset. Follow these steps:
Create the ‘obj.names’ file inside the yolov4 folder. Each line should contain one class name, corresponding to the class names in your dataset.
Create the ‘obj.data’ file in the yolov4 folder with the following contents:
|
1 2 3 4 5 6 |
classes = 1 train = data/train.txt valid = data/test.txt names = data/obj.names backup = /mydrive/yolov4/backup/ |
Make sure to adjust the paths based on your directory structure.
Copy both obj.names and obj.data files to the darknet/data folder using the following commands:
|
1 |
!cp /mydrive/yolov4/obj.names ./data</code> <code>!cp /mydrive/yolov4/obj.data ./data |
4. train.txt file:
Copy the ‘create_train.py’ and ‘create_test.py’ scripts to the /darknet/data folder using the following commands:
|
1 |
!cp /mydrive/yolov4/create_train.py ./</code> <code>!cp /mydrive/yolov4/create_test.py ./ |
Run the following commands to generate the train.txt and test.txt files:
|
1 |
!python create_train.py</code> <code>!python create_test.py |
These scripts generate text files containing the paths to the training and testing images in the /data folder.
5. Download YOLOv4 Pre-trained Weights:
|
1 |
!wget https://github.com/AlexeyAB/darknet/releases/download/darknet_yolo_v3_optimal/yolov4.conv.137 |
This command downloads the pre-trained weights for YOLOv4, which will be used as a starting point for training our custom object detector.
6. Train Your Custom YOLOv4 Object Detector:
Now, we can start training our custom YOLOv4 object detector. Use the following command:
|
1 |
!./darknet detector train yolov4.conv.137 -dont_show -map |
Replace <path_to_obj.data> with the path to the obj.data file and <path_to_custom_config> with the path to the modified yolov4-obj.cfg file.
This command initiates the training process using the specified dataset, configuration, and pre-trained weights. The -dont_show flag disables the live training visualization, and the -map flag computes the mean average precision (mAP) during training.
7. Test Your YOLOv4 Object Detector:
Once the training is complete, you can test your trained YOLOv4 object detector on new images. Follow these steps:
|
1 |
%cd cfg</code> <code>!sed -i 's/batch=64/batch=1/' yolov4-obj.cfg</code> <code>!sed -i 's/subdivisions=16/subdivisions=1/' yolov4-obj.cfg</code> <code>%cd .. |
In these commands, we modify the batch and subdivisions settings in the yolov4-obj.cfg file to facilitate testing on a single image at a time.
Finally, use the following command to test your YOLOv4 object detector:
|
1 |
!./darknet detector test data/obj.data cfg/yolov4-obj.cfg /mydrive/yolov4/backup/yolov4-obj_last.weights /mydrive/images/car2.jpg -thresh 0.3 |
Replace /mydrive/images/car2.jpg with the path to the image you want to test. Adjust the threshold value as needed to control the object detection sensitivity.
By following these steps, you can build, train, and test your custom object detector using YOLOv4.
Conclusion
Object detection plays a vital role in various applications, and YOLOv4 has emerged as a powerful algorithm for accurate and real-time object detection. In this blog, we explored the process of building, training, and testing an object detector using YOLOv4.
We began by understanding the key features of YOLOv4, such as its backbone network, neck network, head network, feature pyramid, and improved loss functions. These advancements contribute to YOLOv4’s exceptional performance in object detection tasks.
We then delved into the steps involved in training YOLOv4 on a custom dataset. This included data preparation, model configuration, annotation conversion, creating the custom .cfg file, preparing obj.data and obj.names files, generating train.txt and test.txt files, downloading pre-trained weights, and finally training the custom YOLOv4 object detector.
Once the training was complete, we learned how to test the trained YOLOv4 model on new images by adjusting the configuration file and running the detection command.
Overall, YOLOv4 provides a robust and efficient solution for object detection tasks, enabling accurate and real-time detection of objects in various scenarios.
With further exploration and experimentation, you can extend the capabilities of YOLOv4, fine-tune it for specific object detection requirements, and even integrate it into larger computer vision systems.
By leveraging the power of YOLOv4, you can unlock a wide range of possibilities in fields like autonomous vehicles, surveillance systems, robotics, and more, ultimately contributing to advancements in technology and enhancing our daily lives.
Related content

Auriga: Leveling Up for Enterprise Growth!
Auriga’s journey began in 2010 crafting products for India’s [...]


