Performance Testing on Auth2 APIs using Jmeter and server cmd line
- Quality Engineering
Performance Testing on Auth2 APIs using Jmeter and server cmd line
What is Performance Testing?
Performance Testing is a software testing process used for testing the speed, response time, stability, reliability, scalability, and resource usage of a software application under a particular workload.
What is OAuth 2.0?
The OAuth 2.0 authorization framework is a protocol that allows a user to grant a third-party website or application access to the user’s protected resources, without necessarily revealing their long-term credentials or even their identity.
Prerequisite-
Basic knowledge of Jmeter working, selenium web driver basic knowledge, JDK should be installed, environment variables are set up.
We are going to create 2 Jmeter scripts-
- Get the access token(Run it on the local machine)
- Send access token with requests(Run it on the server)
1. Jmeter Script 1 OR Step 1-> Get the Access Token-
NOTE- We are going to perform Step 1 on our laptop or PC because if we run step 1 on the server then it would have to open Chrome Browser to generate access tokens and it will be counted in the timing of our performance testing which we don’t want.
To get an access token, there are the following steps-
a. Download Plugin-manager and put .jar file into lib/ext folder of Jmeter
b. Relaunch Jmeter, you will now see ‘Plugins Manager’ under ‘Options’, click on it
c. Install Selenium/Webdriver Support
d. Add a Thread Group under Test Plan
e. Add an HTTP Cookie Manager
To add the mentioned file, follow this-> Add->Config Element->HTTP Cookie Manager
f. Add CSV Data Set Config
To add the mentioned file, follow this-> Add->Config Element->CSV Data Set Config
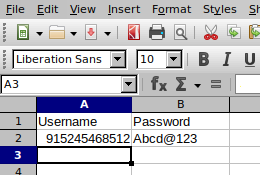
g. Set CSV file path like below-

CSV file contains ‘Username’ and ‘Password’ which will be used in jp@gc — WebDriver Sampler file 
h. Add a jp@gc — WebDriver Sampler
To add the mentioned file, follow this-> Add->Sampler->jp@gc — WebDriver Sampler
i. Download the Chrome driver according to Chrome’s version and extract it.
j. Add a jp@gc — Chrome Driver Config
To add the mentioned file, follow this-> Add->Config Element->jp@gc — WebDriver Sampler
k. Set the path to the Chrome driver,

l. Add View Results Tree
To add the mentioned file, follow this-> Add->Listener->Views Results Tree
m. Put the code in the Script section in the jp@gc — WebDriver Sampler to Login.
|
1 2 3 4 5 6 7 8 9 10 11 12 13 14 15 16 17 18 19 20 21 22 23 24 25 26 27 28 29 |
//WebDriver classes var pkg = JavaImporter(org.openqa.selenium); var support_ui = JavaImporter(org.openqa.selenium.support.ui.WebDriverWait); var wait = new support_ui.WebDriverWait(WDS.browser, 5000); var ui=JavaImporter(org.openqa.selenium.support.ui) //captures sampler's start time WDS.sampleResult.sampleStart(); WDS.sampleResult.getLatency(); WDS.log.info("Sample started"); //opens website WDS.browser.get('the authorization request'); //login var wait=new support_ui.WebDriverWait(WDS.browser,20) wait.until(ui.ExpectedConditions.visibilityOfElementLocated(pkg.By.name('username'))) var userName = WDS.browser.findElement(pkg.By.id('username')); userName.click(); userName.sendKeys(['your name']); var password = WDS.browser.findElement(pkg.By.id('password')); //saves search field into searchField password.click(); //clicks search field password.sendKeys(['your password']); var loginbtnsignin = WDS.browser.findElement(pkg.By.id('login-btn-signin')); loginbtnsignin.click(); WDS.sampleResult.sampleEnd() |
n. Extract Authorization Code from the response of the previous step.
For extracting, follow below->
right-click on jp@gc — WebDriver Sampler-> Add-> Post Processors-> Regular Expression Extractor-> put values in this file as shown in below image-

o. Add an HTTP Request Sampler in the Thread Group.
To add the mentioned file, follow this-> Add -> Sampler ->HTTP Request Sampler
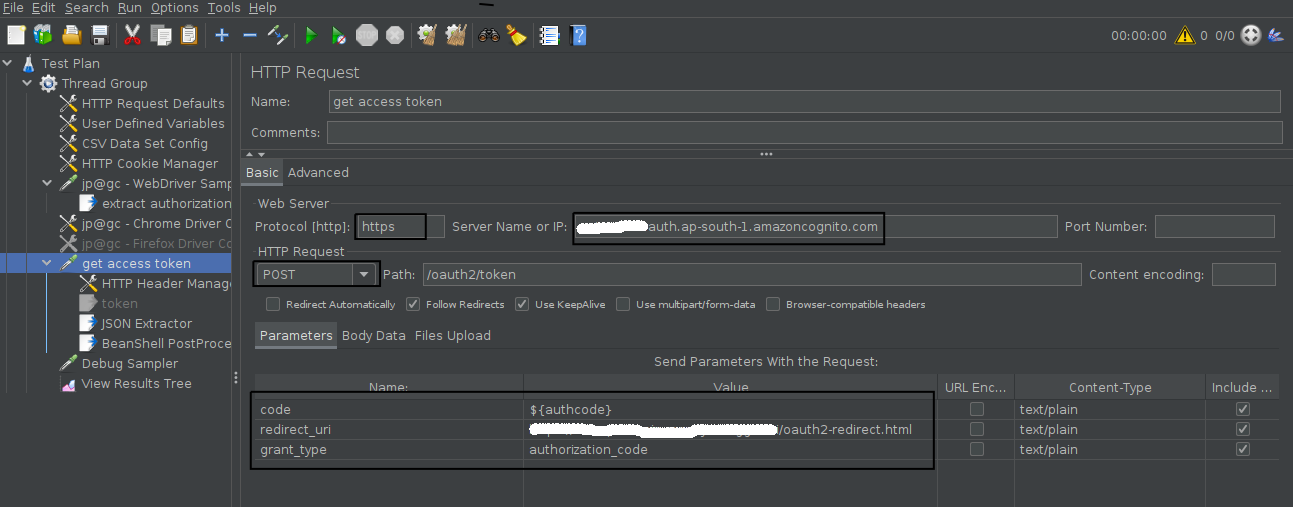
p. Fill in the path and required parameters as shown in the below image.
${authcode}- It will get the authorization code extracted in step ‘n’.
redirect_uri- There is always a redirect uri, get it from your developers.
grant_type- put as it is.

q. Add an HTTP Header Manager in the HTTP Request Sampler added in step ‘o’.
To add the mentioned file, follow this-> Add -> Config Element -> HTTP Header Manager
r. Fill the basic authentication string in the HTTP Header Manager.
To generate a Basic authentication string, go here, put Client ID in ‘Username’ and Client Secret in ‘Password’ and click on generate.

s. Extract Access Token from the response of the previous step.
For extracting, follow below->
Add-> Post Processors-> JSON Extractor-> put values in this file as shown in below image-

t. Store generated access tokens in a CSV file
To store, follow below->
Add-> Post Processors-> BeanShell PostProcessor-> put below code in script section-
note- “access_token” variable is the same as defined in step ‘s’ and CSV file should be all blank.
|
1 2 3 4 5 6 7 8 9 10 11 |
// get variables from regular expression extractor token = vars.get("access_token"); // pass true if want to append to existing file // if want to overwrite, then don't pass the second argument FileWriter fstream = new FileWriter("PUT FULL PATH OF THE CSV FILE HERE", true); BufferedWriter out = new BufferedWriter(fstream); out.write(token); out.write(System.getProperty("line.separator")); out.close(); fstream.close(); |
u. Values will be stored and the file will look like below

v. Now give a name to the column so that we can use this CSV in our 2nd script like I have given the column name as ‘access_token’

2. Jmeter Script 2 OR Step 2-> Send access token with requests-
w. Create New Test Plan-> Create new thread group-> Create new HTTP Request Sampler-> add Path, server name, request body.
NOTE- This is the request we are going to test for performance testing so it’s your organization’s application’s request so fill it as it supposed to.
x. Add CSV Data Set Config and Set file path like shown in step ‘f’ and ‘g’
CSV file contains ‘access_token’ which we created in step’v’

y. Add an HTTP Cookie Manager like shown in step ‘e’
z. Add an HTTP Header Manager in the HTTP Request Sampler added in step ‘w’.
To add the mentioned file, follow this-> Add -> Config Element -> HTTP Header Manager
Provide the value from CSV like-

Run script created in Step 2 on the server-
1. Zip the whole Jmeter install folder and upload it on the server and then extract there-> Now Jmeter is set up on the server
2. Upload below 2 files on the server to any of your folders-
.jmx file of script 2
CSV file of step ‘x’
3. Run below command on server
./jmeter.sh -n -t /home/ubuntu/test.jmx -l /home/ubuntu/test.jtl -j /home/ubuntu/test.log -e -o /home/ubuntu/jmeter_report -DTHREADS=1 -DRAMP_UP=1 -DLOOP_COUNT=1 -DCSVPATH=/home/ubuntu/csv
Related content
Auriga: Leveling Up for Enterprise Growth!
Auriga’s journey began in 2010 crafting products for India’s
