Ansible
- DevOps
- Digital Engineering
- General

Ansible
Automating with Ansible: A Newbie-Friendly Guide
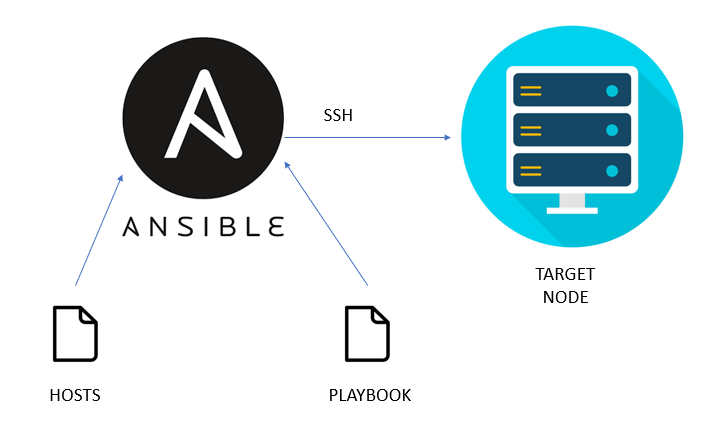
Ansible is a powerful DevOps tool designed for automating tasks on remote servers or nodes. In simple terms, it allows you to automate commands and functions on multiple remote machines from a central ‘master’ node. To illustrate its usefulness, consider a scenario where you need to reboot dozens or even hundreds of remote hosts. You could manually SSH into each one and initiate the reboot, or you can use Ansible to streamline the process, making it efficient and offering a wide range of additional functionalities.
In essence, Ansible operates much like the second method mentioned, using SSH (Secure Shell), a secure communication protocol, to control remote nodes in a secure and optimized manner.
Ansible Components
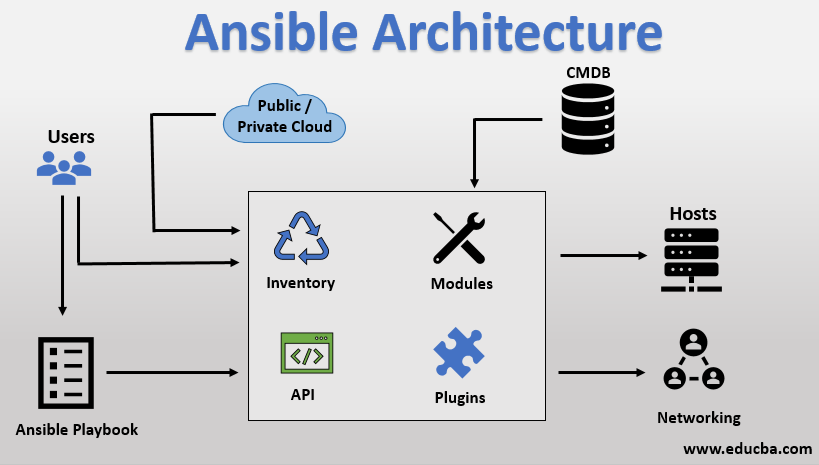
Ansible Core Components

1. Control Node –
- The central or main node where Ansible is installed.
- Used to trigger commands like ansible and ansible-inventory on other nodes.
- Acts as the orchestrator for Ansible operations.
2. Manage Node–
- A remote or slave node where tasks are executed or controlled by Ansible.
- These are the servers or devices you want to manage or automate.
3. Inventory –
- A list of managed node IPs and configurations.
- Logically organized, typically using file formats like YAML or INI.
- Created on the control node to describe the deployment of hosts to Ansible.
Ansible Additional Components
1. Ad-Hoc Commands –
- These are one-off commands that you can execute using the ansible command.
- Useful for quick tasks or tests on remote nodes.
2. Plugins –
- Plugins are pieces of code that extend Ansible’s core functionality.
- Ansible uses a plugin architecture for flexibility and expandability.
- Examples include connectivity plugins for establishing connections and cache plugins.
- Learn more about Ansible plugins.
3. Module–
- Modules are built-in functions that can be used to perform various tasks.
- They eliminate the need to write custom code for common operations.
- Examples include modules for package management (apt, yum), service management, and more.
- Explore Ansible modules.
4. Playbook –
- Playbooks are a sequence of plays that define the order of tasks executed by Ansible.
- A play consists of a list of tasks that target managed nodes in an inventory.
- Tasks, in turn, are composed of one or more modules that specify operations.
- Playbooks provide a structured way to define and automate complex workflows.
5. Roles –
- Roles provide an organized environment for managing complex tasks.
- They include templates, playbooks, inventories, error handlers, vars, and meta information.
- Ideal for handling larger, multi-step automation processes.
6. Collections –
- Collections are distribution formats for Ansible content.
- They encompass playbooks, roles, modules, and plugins.
- Find Ansible collections.
7. Galaxy –
- Ansible Galaxy is a platform for sharing and downloading collections.
- It allows the Ansible community to collaborate and exchange automation content.
Setting Up the Ansible Control Node
Prerequisite:
Before you begin setting up Ansible, it’s essential to ensure you meet the following prerequisites:
- SSH: Make sure SSH is installed on your Linux system. SSH is crucial for secure communication between the control node and managed nodes.
Installation Steps:
- Open your terminal.
- Run the following command to install Ansible:
1python3 -m pip install --user ansible
- SSH Key:
- For secure and direct connections to managed nodes, you’ll need to provide a public SSH key. You can generate one using the ssh-keygen command.
- Follow the on-screen instructions to create your SSH key pair. This key pair is a crucial element of Ansible’s secure communications.
- For specific installation instructions tailored to your Linux distribution, click here.
- Try to connect ssh using once your mange node is set up.
1ssh <user>@<ip>
Note: If you’re using a different operating system, find the appropriate installation instructions here.
Setting Up the Ansible Mange Node
Steps:
- Install OpenSSH-Server:
- To enable remote management of the managed node, you’ll need to install the OpenSSH server. Use the following command (assuming you’re using a Debian-based Linux distribution like Ubuntu):
This command installs the OpenSSH server, allowing secure remote access.1sudo apt install openssh-server
- To enable remote management of the managed node, you’ll need to install the OpenSSH server. Use the following command (assuming you’re using a Debian-based Linux distribution like Ubuntu):
- Create a User:
- For convenience and consistency, it’s helpful to create a user on the managed node with the same name as the user on the control node. This makes it easier to manage SSH keys and ensures a smoother experience.
- Configure SSH Key:
- To establish secure and direct connections to the managed node, you need to paste the public SSH key from the control node into the authorized_keys file located in the .ssh directory of the user’s home folder on the managed node.
- The path is typically /home/<user>/.ssh/authorized_keys, where <user> is the username you created or are using on the managed node.
You can use the ssh-copy-id command to automate the process of copying your public key to the managed node. For example:This command securely copies your public key to the authorized_keys file, allowing passwordless SSH authentication.1ssh-copy-id <user>@<managed_node_ip>
Managing Ansible Inventories
In the world of Ansible, inventories are like the backbone of your automation infrastructure. They serve as a vital component that lists and organizes the managed nodes, making automation tasks seamless and organized. Inventories use a parent-child concept that allows you to create groupings, which come in handy during specific tasks or scenarios.
Why Are Inventories Important?
- Inventories provide a comprehensive list of managed nodes, making it easy to interact with and manage them.
- Groupings in inventories enable you to organize your infrastructure, allowing you to target specific subsets of nodes based on your needs. For instance, when you need to perform tasks in a particular location, groupings become essential.
Creating Inventories
There are two primary methods to create an inventory on the control node: using a YAML file or an INI file.
-
INI Inventory Example (inventory.ini):
In this INI file, it captures the IP addresses of managed nodes. The default username used for SSH connections is typically the working user of your control node.123[virtualmachines]host1 ansible_host:192.168.0.1192.168.0.2ansible_host: This parameter is used to specify the IP address, although you can write the IP directly.
-
Inventory.yaml
1234567---virtualmachines: # Define a class name to represent a particular group of devices.hosts: # Define the hosts.vm01: # Define a parent name to indicate a class of parent type.ansible_host: 192.168.0.1 # Specify the IP address.http_port: 80 # (optional) Define the HTTP port.ansible_user: auriga # (optional) Provide the username if it's different from the control node's user.- ansible_user: Use this to specify a different user if the managed node’s user is not the same as the control node’s user.
- http_port: Specify a port if necessary.
In real-world scenarios, inventory files can be more complex, reflecting the diverse and extensive infrastructure of organizations. You can explore more configurations here.
Verifying Your Inventory
After creating your inventory, it’s a good practice to verify its correctness. This step ensures that the inventory is correctly structured and accessible to Ansible. To do this, use the following command:
|
1 |
ansible-inventory -i inventory.yaml --list |
- -i: Indicates the inventory file you want to use.
- –list: Requests the listing of the inventory content.
output:

By following these steps, you have effectively set up and verified your inventory, ensuring a solid foundation for your Ansible automation.
Using Ansible Ad-Hoc Commands
Introduction:
In Ansible, ad-hoc commands are your go-to solution for executing quick, one-off tasks on remote nodes. They provide a straightforward and efficient way to interact with managed nodes without the need for creating full-fledged playbooks. Ad-hoc commands are particularly useful when you need immediate results without the overhead of playbook development.
When to Use Ad-Hoc Commands:
Ad-hoc commands are best suited for scenarios where the task at hand is simple and doesn’t require the complexity of a playbook. They are perfect for tasks like system health checks, package installation, service management, or any other single-operation job.
Ad-Hoc Command Syntax:
Ad-hoc commands follow a specific syntax that comprises various components, each serving a unique role:
- Target Group: This is the group of hosts you intend to target with the ad-hoc command.
- Module (-m): Specifies the module to execute. Modules are Ansible’s building blocks for performing tasks, and they can range from basic operations like “ping” to more advanced tasks such as package management.
- Inventory File (-i): Indicates the location of your inventory file, which defines the list of target devices.
Example: Ping All Inventory Devices
To illustrate the use of ad-hoc commands, let’s consider a simple task: pinging all devices listed in your inventory. Here’s the command:
|
1 |
ansible virtualmachines -m ping -i inventory.yaml |
virtualmachines is the target group. In this case, it could be any group, or you can use all to target all devices in your inventory.
- -m ping specifies the “ping” module, a basic module that checks the reachability of the managed nodes.
- -i inventory.yaml points to the inventory file containing the list of devices.
- The “ping” module sends a test command to the target devices and reports their status, confirming whether they are responsive.
Output and Result:

In the above example the ssh host is not reachable.

In the above output image it is working fine
Example: Installing Nginx Using Apt Module
For a more practical example, let’s use the “apt” module to install Nginx on your managed nodes. Here’s the command:
|
1 |
ansible all -i inventory.yaml -m apt -a "name=nginx state=present" --become --ask-become-pass |
- -m apt specifies the “apt” module, which is responsible for package management.
- -a “name=nginx state=present” includes variables for the module to act upon, such as specifying that Nginx should be installed (state=present).
- –become signifies that the command should run with elevated privileges (sudo).
- –ask-become-pass prompts for the sudo password of the managed node to ensure the installation proceeds smoothly.
Output and Result:
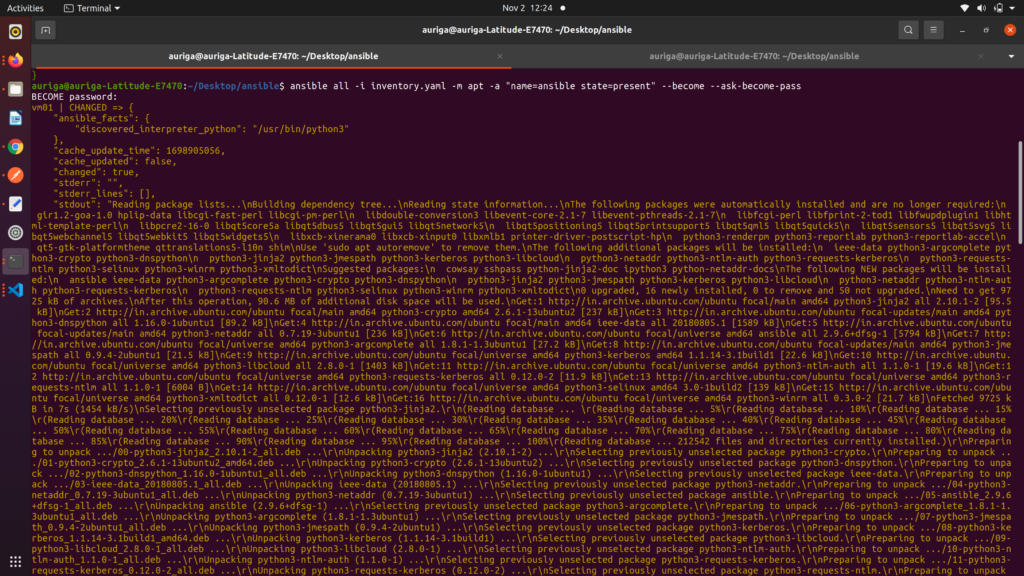
By using these ad-hoc commands, you can perform quick, task-specific operations on your managed nodes, saving time and effort in your automation tasks.
Common Modules:
Ansible offers an extensive library of modules for various tasks, from system administration to application deployment. You can explore the full list of Ansible modules in the official documentation to find the most suitable module for your specific requirements.
Best Practices:
When working with ad-hoc commands, consider using SSH key-based authentication for secure, passwordless access. It streamlines the authentication process and enhances the security of your automation tasks.
Using Ansible Playbooks
Introduction:
In the world of Ansible, playbooks are the cornerstone of structured and complex automation. While ad-hoc commands are perfect for quick and isolated tasks, playbooks step in when you need a well-orchestrated sequence of operations. They allow you to tackle multi-step automation scenarios where tasks depend on each other, and conditional actions are required.
Let’s delve deeper into the importance of playbooks:
The Role of Playbooks:
Playbooks serve as the framework for orchestrating automation tasks that involve a sequence of operations. Whether it’s configuring servers, deploying applications, or managing infrastructure, playbooks provide a structured way to define how these tasks are executed.
Ad-Hoc Limitations:
While ad-hoc commands are ideal for single, immediate tasks, they are not designed for complex, multi-step automation. Playbooks come to the rescue when tasks have interdependencies and need to be executed in a coordinated manner.
Readability and Reusability:
Playbooks are authored in YAML, a human-readable and straightforward format. This not only makes them easy to write but also facilitates sharing and collaboration. You can reuse playbooks across various scenarios, saving time and effort.
Conditional and Looping Logic:
Playbooks offer advanced features, including conditional statements and looping, that allow you to adapt automation to different situations. This flexibility makes playbooks versatile and capable of handling a wide range of automation needs.
In essence, playbooks are your tool of choice when automation tasks become multi-faceted and require a structured and logical approach. They provide the power to streamline and automate complex workflows with precision and efficiency.
Example: Ping All Inventory Devices
To illustrate the use of a playbook, let’s consider a simple task: pinging all devices listed in your inventory. Here’s the command:
playbook.yaml
|
1 2 3 4 5 6 |
--- -name : My First Play #Name of play hosts: virtualmachines #defining host can be all tasks: -name:Ping My Hosts #Name of task ansible.builtin.ping: # can also write ping |
To run a playbook, use the following command:
|
1 |
ansible-playbook -i inventory.yaml playbook.yaml |
Output and Result:
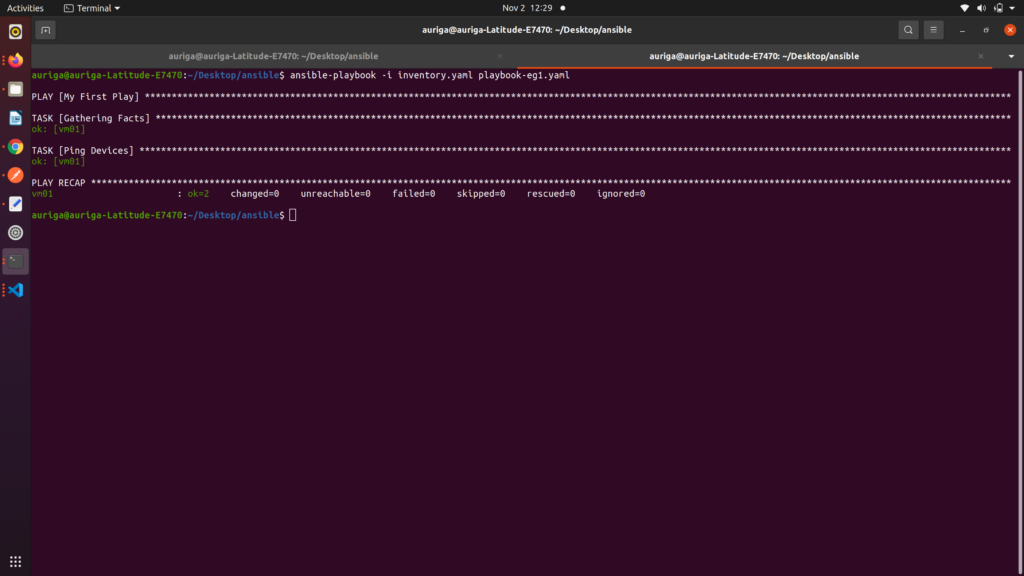
As you can see there is gathering facts task which we didn’t create is running it is the default task which ping the connection.
Example: Installing Nginx Using Apt Module
For a more practical example, let’s use the “apt” module to install Nginx on your managed nodes. Here’s the command:
playbook.yaml
|
1 2 3 4 5 6 7 8 9 |
--- - name: Install Nginx hosts: all become: yes tasks: - name: Install Nginx using apt apt: name: nginx state: present |
To run a playbook, use the following command:
|
1 |
ansible-playbook -i inventory.yaml playbook.yaml --ask-become-pass |
This command executes the specified playbook while prompting for the necessary privilege escalation password.
Output and Result:
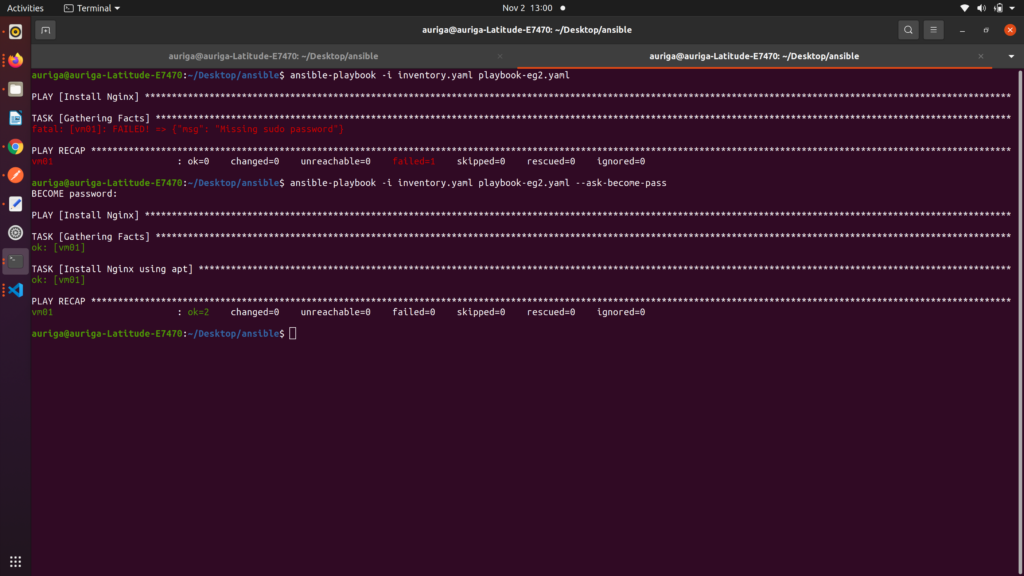
As shown in the example image above, the first command encountered an error due to the absence of the –ask-become-pass flag. This flag is essential when your task requires elevated privileges, as it prompts Ansible to request the sudo password for authentication.
The corrected command includes the –ask-become-pass flag, ensuring that the necessary privileges are obtained before executing the task. This is particularly important when working with tasks that require administrative access, such as package installations or system configurations.
Note:
In this blog, we primarily focus on the core and fundamental components of Ansible, providing an introductory overview and understanding of its key concepts. While Ansible offers advanced features such as “Collections,” “Ansible Galaxy,” “Roles,” ”Dynamic Inventory,” and “Custom Modules and Plugins,” we recognize that these topics are extensive and may require separate dedicated discussions. For the purpose of this blog, we aim to establish a strong foundation of Ansible’s core components. If you’re interested in diving deeper into these advanced topics, we recommend exploring Ansible’s official documentation and additional resources dedicated to each subject.
Related content

Auriga: Leveling Up for Enterprise Growth!
Auriga’s journey began in 2010 crafting products for India’s